We are thrilled to announce the release of version 6 of the Exceptionless .NET client. Our team has been working to enhance the client's out of the box functionality and clear out the entire backlog of feature requests and issues!
We've made changes to all our logging targets like (E.G., NLog, Microsoft.Extensions.Logging, Serilog) to automatically configure the default log level to Trace via the ExceptionlessClient.Default.Configuration.SetDefaultMinLogLevel method. This method controls how we process log levels until we have server side dynamic log levels! Now users will see logs immediately on app startup when a logging provider is configured.
We've also updated NLog from version 4 to version 5! Bringing in many new enhancements to the logging provider through community contribution!
We had to introduce some necessary breaking changes around serialization. Rest assured, we've kept these breaking changes minimal and they should not effect anyone. For more information, please refer to the upgrade guide.
Upgrading to the latest version of the Exceptionless .NET client is simple. Just update your NuGet package, and you're good to go. As always, our documentation is available to help you with the upgrade process, and our support team is always here to answer any questions you may have.
We are thrilled to announce our latest update, packed with new features, improvements, and bug fixes designed to elevate your experience with our platform. With support for Discord notifications, Elasticsearch 8, OpenTelemetry, .NET 7, and arm64, we're confident that this release will make a significant impact. Plus, we've merged our UI codebase into our main repo, streamlining self-hosting and development for our users.
We have merged the UI into the web project to streamline self-hosting and development, making it easier for users to manage and maintain their projects. This makes it much easier to deploy and get started with our project without having to clone multiple repositories or configure multiple docker images!
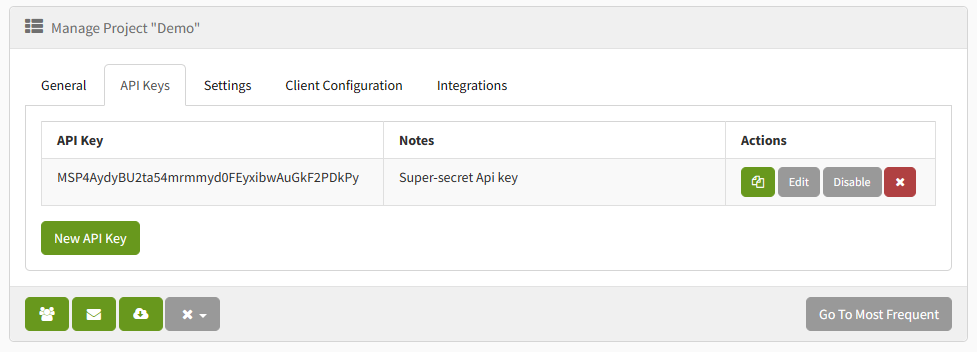
You now have the ability to suspend API tokens, giving you greater control over your account security. Just navigate over to your manage projects API Keys tab and click on the Disable button.
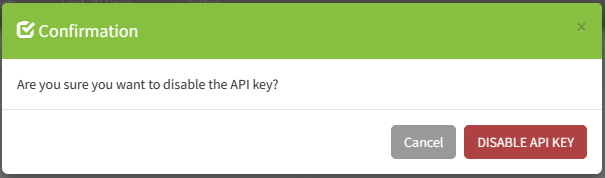
This will bring up a modal to confirm you want to disable the API Key.
You can always reenable the API Key later by clicking on the Enable button.
We've added the ability to send Slack webhook messages if the URL ends with /slack. This feature allows you to send notification messages to Discord and other platforms, keeping you informed about your projects.
Our latest update includes support for Elasticsearch 8, ensuring that you can take advantage of the latest features and improvements offered by Elasticsearch.
Our platform now supports arm64 hosting, expanding compatibility and ensuring a seamless experience across various platforms. This not only increases performance but saves on self hosting costs.
Self-hosters need to pay attention to the upgrade process for this release. If you are self-hosting Exceptionless, please review the Self Hosting Documentation, which contains information about upgrading your existing installation.
This release reflects our commitment to constantly enhancing our platform and offering the best possible experience for our users. For a complete list of changes, please review the change log.
We encourage you to explore the new features and enhancements, and as always, we welcome your feedback and suggestions.
We are excited to announce our latest release, which not only clears the entire JavaScript client GitHub backlog but also brings in a whole range of awesome new capabilities!
Our team has been hard at work, and we believe this update will greatly improve the developer experience while addressing critical issues and enhancing the overall functionality of our offering. Below are some of the highlights of this release.
The improved client behavior now ensures a graceful termination when the last app statement executes, resulting in a significantly better CLI/Lambda experience for developers.
This release includes a plethora of new features and fixes, such as:
Support for serializing event data with a maxDepth. As part of this we did a lot of work to add a prune implementation that handles all cases like circular references, Typed Arrays, Unsupported types (E.G., Buffers) and more
Improved handling of different promise rejection error types
We have now made it easier to access all transitive exports (from @exceptionless/core) in dependent packages. This resolves issues with browser bundles and @exceptionless/core imports, ultimately enhancing the developer experience.
Our readme now includes updated information on Node --enable-source-maps, ensuring developers have the most up-to-date guidance for using this feature.
We now use the toError function for jQuery and Angular errors, fixing issues where the client may have thrown an exception due to an invalid error type. Additionally, we have added examples for various error browser integrations (e.g., jQuery).
This release reflects our commitment to continuously improving our product and offering the best possible experience for our users. We encourage you to explore the new features and enhancements, and as always, we welcome your feedback and suggestions.
We are thrilled to announce the release of our latest version of the Exceptionless .NET client, version 5.0. This release includes a major new feature, support for Blazor.
Blazor is a framework for building web applications using C# and Razor, a markup syntax for HTML. It allows developers to build interactive, client-side web applications with .NET. This means that you can now use Exceptionless to track and report errors in your Blazor applications with the same ease and flexibility that you have come to expect from our .NET client.
With this release, Exceptionless now supports both server-side and client-side Blazor. This means that you can track and report errors that occur on the server, as well as in the browser. This is particularly useful for debugging and troubleshooting issues that may only occur in certain browser environments.
Upgrading to the latest version of the Exceptionless .NET client is simple. Just update your NuGet package, and you’re good to go. As always, our documentation is available to help you with the upgrade process, and our support team is always here to answer any questions you may have.
We are constantly working to improve our .NET client and provide the best error tracking and reporting experience for .NET developers. With the addition of Blazor support, we believe that we have taken another step forward in achieving that goal. We can't wait to see what you build with it!
It seems there is a new JavaScript framework launched everyday. And while that is largely true, some standout above the rest. When Svelte first came out, it would have been easy to write it off as "yet another JS framework." However, Svelte quickly found its community. It has passionate supporters, great contributors, and was recently named the most-loved web framework.
Svelte differentiates itself from other JavaScript web frameworks by NOT including a virtual DOM. Basically, it is the antithesis to React. Direct DOM manipulation was once the norm with plain old JavaScript and jQuery, but its since been replaced by the many many frameworks out there that implement a virtual/shadow DOM.
With Svelte taking a different approach to JavaScript web frameworks, we should explore how (if at all) handling events and monitoring those events works in Svelte. Open-source ❤️ open-source, so we'll use the open-source event monitoring tool, Exceptionless alongside our Svelte app.
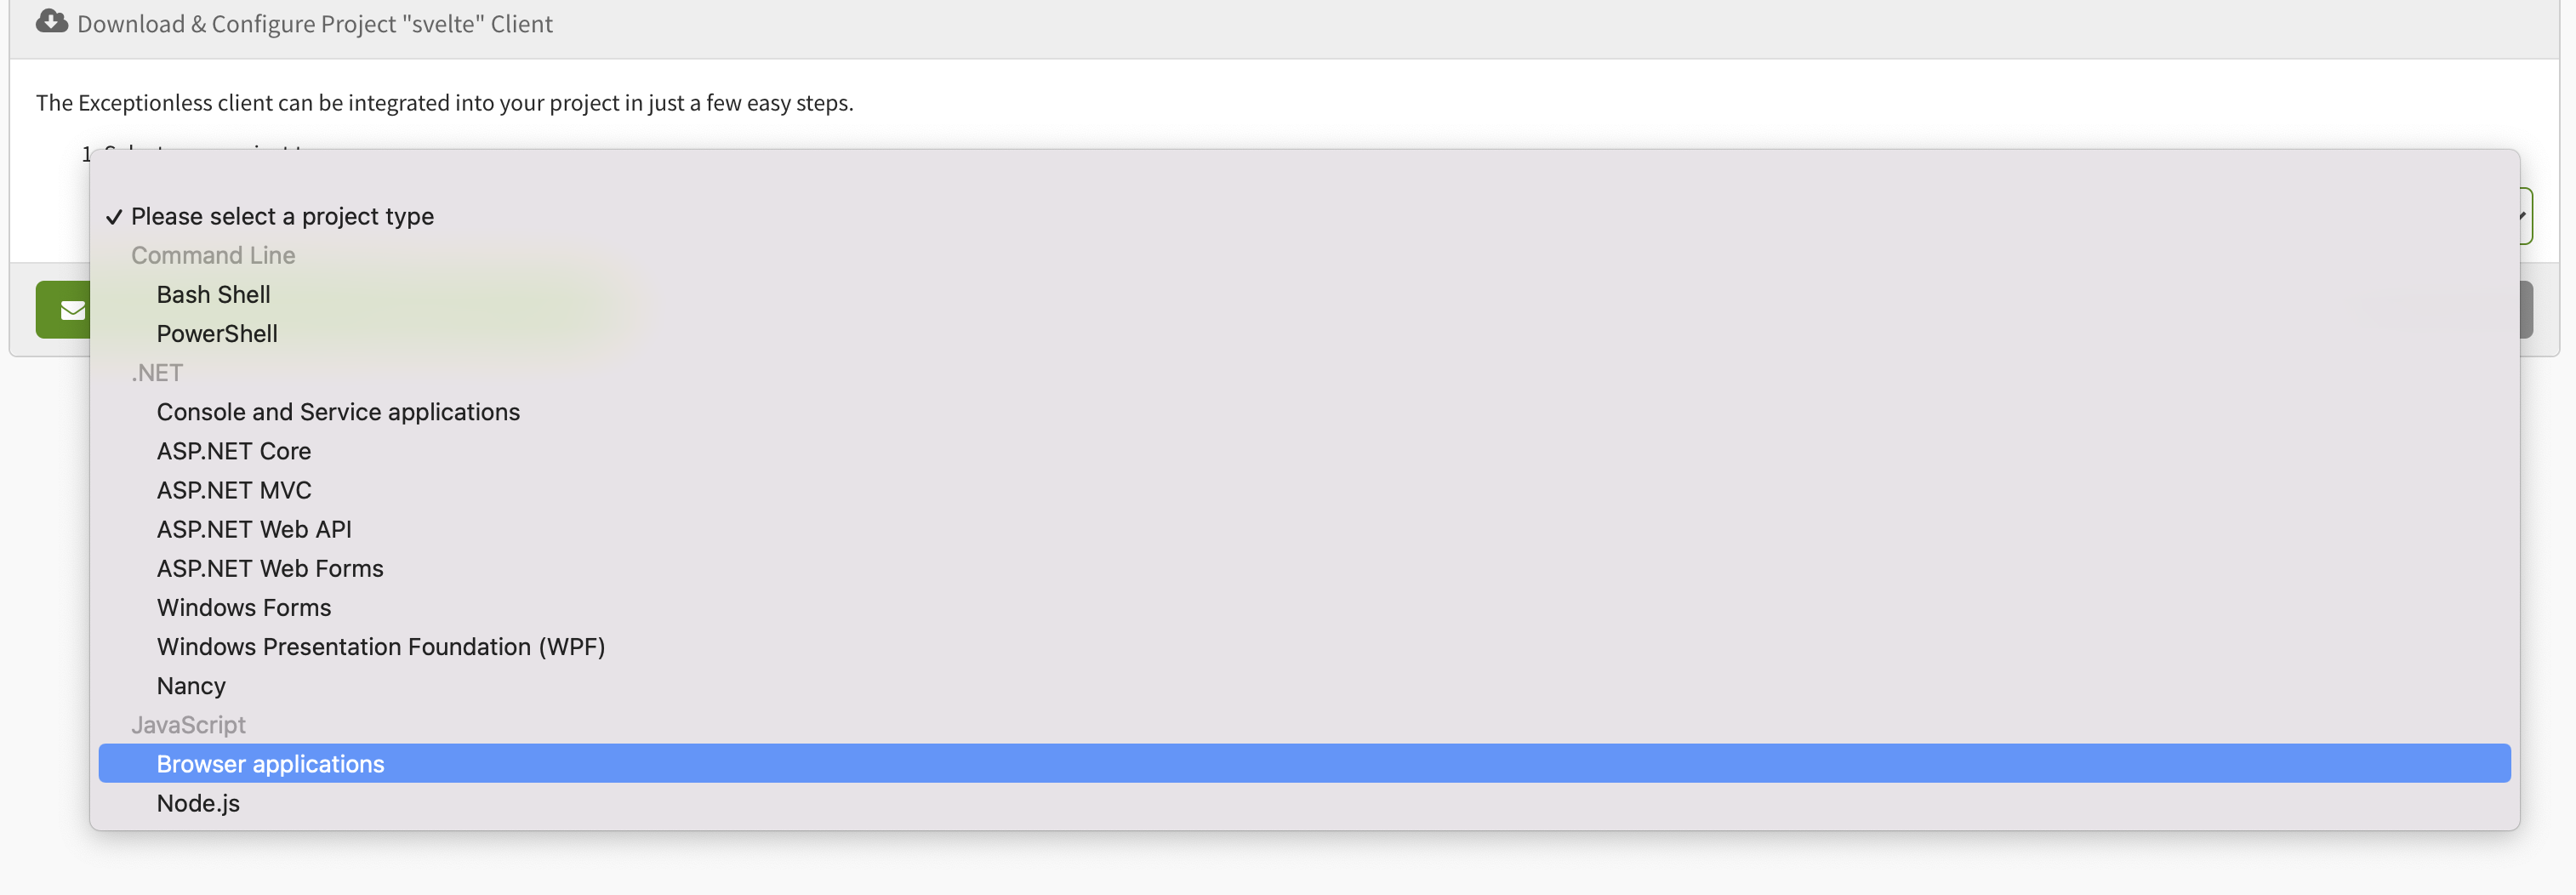
We'll get started by signing up for Exceptionless. Note, you can also run this locally by grabbing the source code and following the instructions here. When you have signed up, you'll be prompted to create a new project. As we create the new project, we'll be prompted ot select the type of project. For this choose "browser application":
This will give you the install instructions, but don't worry, I'll provide those here as well. Next, click Manage Project and you'll want to grab your API key from the API keys tab.
Now, we can generate our Svelte project. We'll use deget so that we can get a full project scaffolding set up easily. Read more about that here.
npx degit sveltejs/template exceptionless-svelte
cd exceptionless-svelte

npm install
Now, our last step before opening up a code editor is to install the new Exceptionless JavaScript client. You can do so by running this from inside your project directory:
npm i @exceptionless/browser
Now, you can fire up the app by running:
npm run dev
Don't worry about how it looks, we're going to instead focus on how to capture events and errors in the app using Exceptionless. Let's dive into that!
Svelte, like other JavaScript frameworks, allows you to build apps through a collection of components. However, to keep this tutorial simple, we will keep everything in out App.svelte file. So, let's start there. Open your exceptionless-svelte project in your favorite code editor, then find the App.svelte file.
You'll notice that with Svelte, we have a normal-looking script tag at the top of the file and then some HTML. This is because there is no virtual DOM. We're really just dealing with templating, reactive state, and plain JavaScript—which is pretty fun.
Let's import Exceptionless at the top of our script tag, and then let's start Exceptionless up.
import{ Exceptionless }from"@exceptionless/browser" Exceptionless.startup("YOUR API KEY");
Notice that we had to wrap our startup call in a function. This is because Svelte doesn't yet support to-level awaits. If it did, we would simply call await Exceptionless.startup("YOUR API KEY").
This App.svelte file doesn't have a lot going on, so let's change that. Let's make the name variable you see in our code above dynamic. We're not going to go deep into state/props with Svelte, but if you look in the main.js file, you'll see a prop variable called name. We also have that variable at the top of our App.svelte file. Changing it is as simple as assigning a new value. Which is exactly what we'll do. This is not the reactive way of handling state variables, so I encourage you to check out the docs here.
So, first, in the HTML, between your main tags, change things to look like this:
<main> <h1>Hello {name}!</h1> <p>Type a new name below to change the name variable.</p> <inputon:change={handleChange}placeholder="new name"/> </main>
Then in your script tag, add a handleChange function like this:
consthandleChange=(e)=>{ name = e.target.value; }
Save your code, then visit localhost:5200. Type a new name in the input field and you'll see Hello World change to Hello ${new name}. Very cool. But we came here to montior events and take names!
Let's change our handleChange function to track that event with Exceptionless. This is a feature of our app, and Exceptionless includes a nice feature usage method in its JS client. We'll use that.
Change the handleChange function to look like this:
consthandleChange=async(e)=>{ name = e.target.value; await Exceptionless.submitFeatureUsage("Name Change"); }
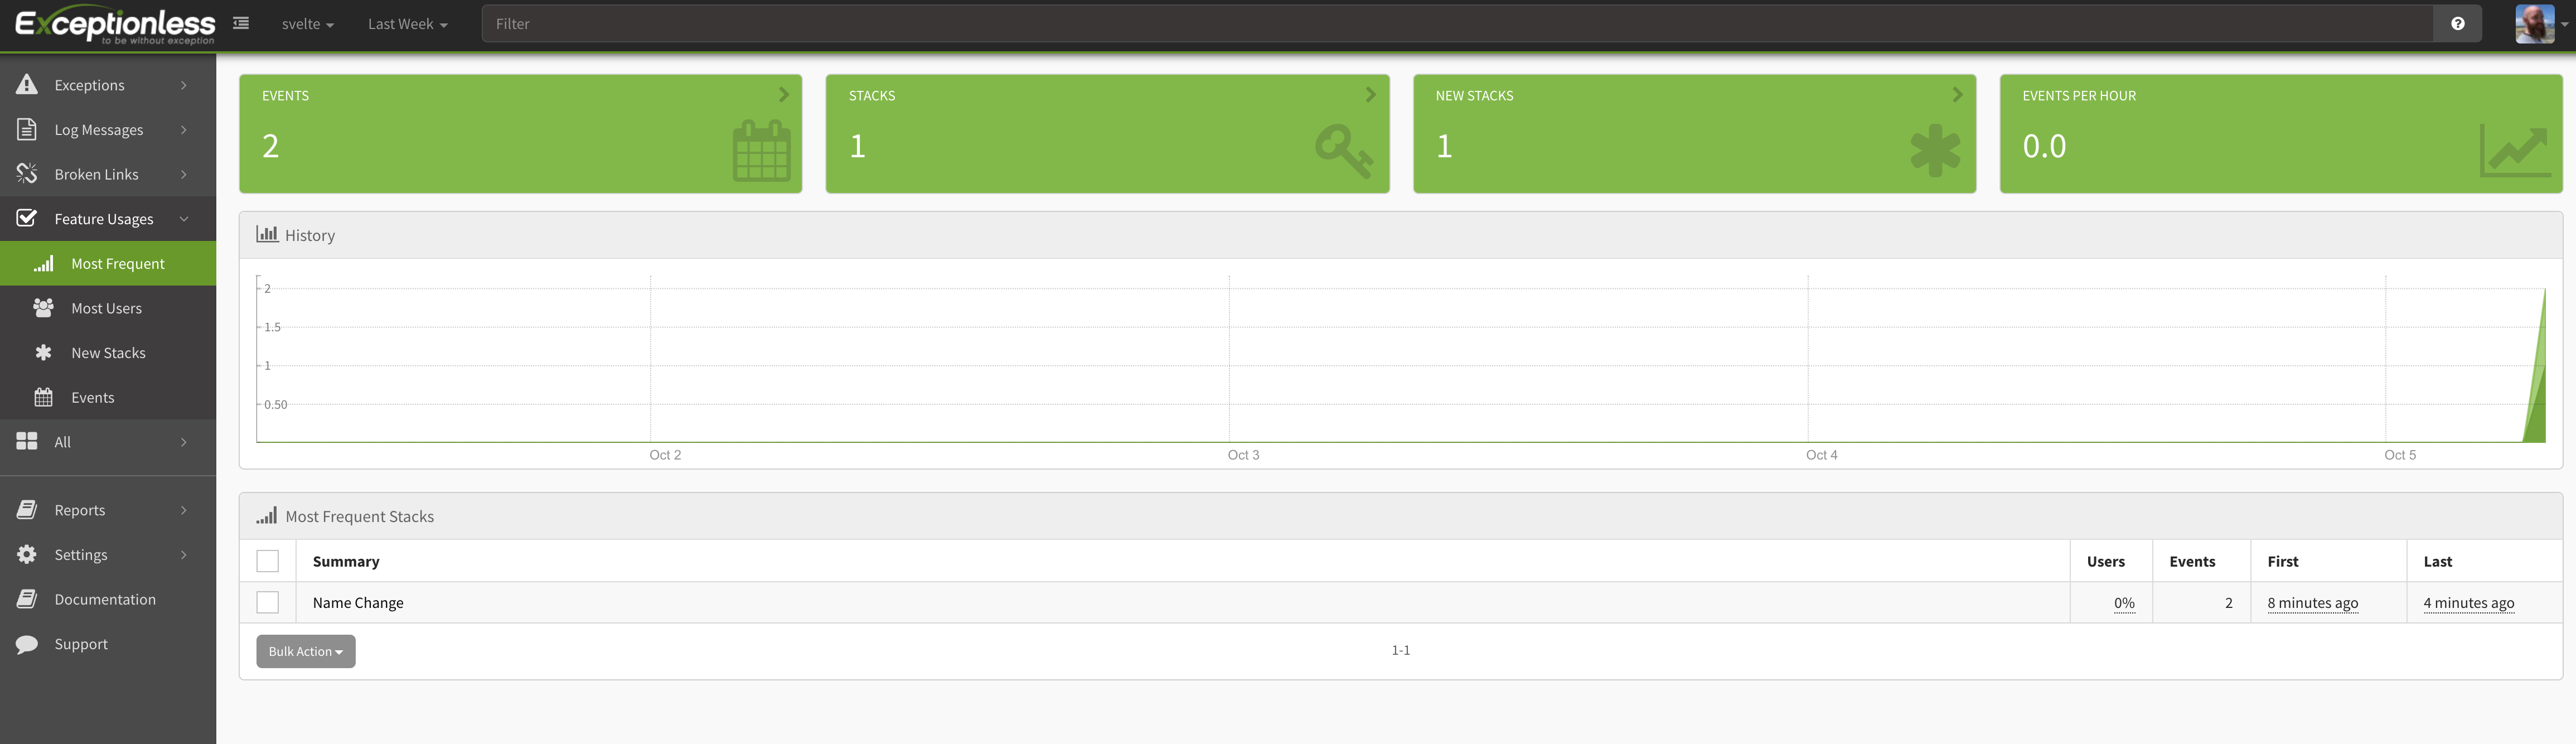
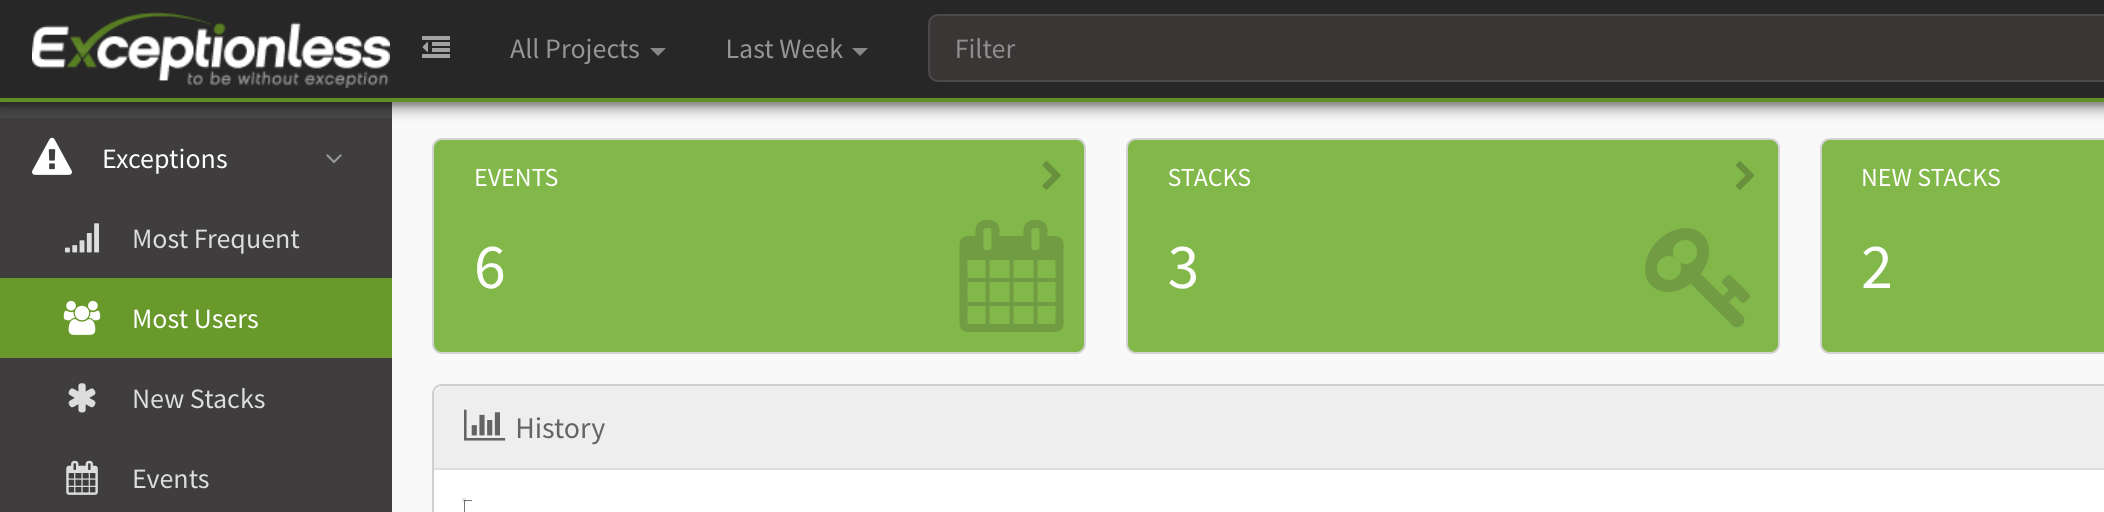
We are submitting the name change event to Exceptionless and tracking it as a feature usage event called "Name Change". Let's take a look at how this looks in our Exceptionless dashboard. Log in again and click on the Feature Usages tab on the left. Then click on Most Frequest. Here you'll see your new Feature Usage events.
Pretty cool, huh! There's a lot more you can layer in, including user details. This is powerful when you want to see how often particular user cohorts use a particular feature.
Now, we can't talk about event monitoring without talking about errors, right? Let's see what error handling looks like in Exceptionless and Svelte. Let's first start by adding a button to our app and some code that will throw an error when that button is clicked.
Under the input element in your main html tags, add this button:
Then in your script tag, add the unhandledError function:
constunhandledError=async()=>{ thrownewError("You shouldn't be clicking that!"); }
We aren't even doing anything to handle this error. What?! That's because Exceptionless will automatically send unhandled errors through so you can track them.
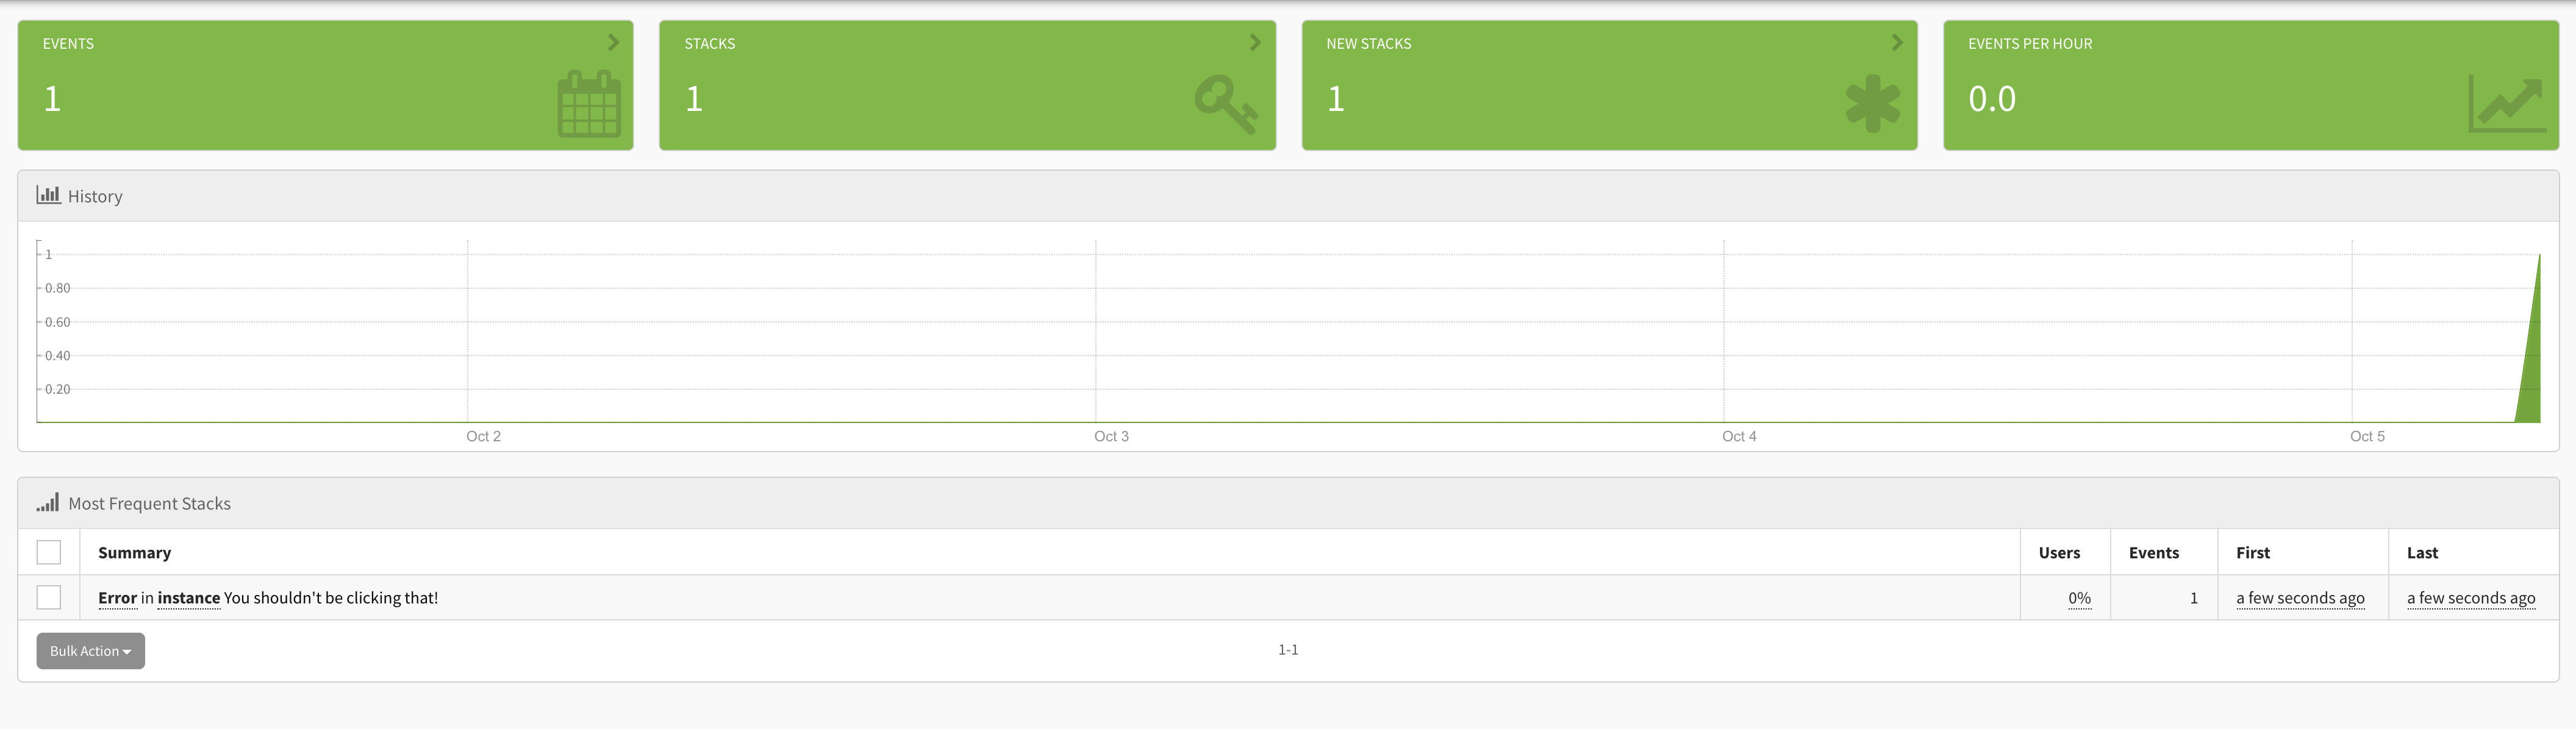
Go ahead and click the button. When you do so, nothing will happen. You can wire up your app to show some message if you want, but what we're really focused on is capturing the error in Exceptionless. Head over to your Exceptionless dashboard and click on Exceptions then Most Frequent. You should see something like this:
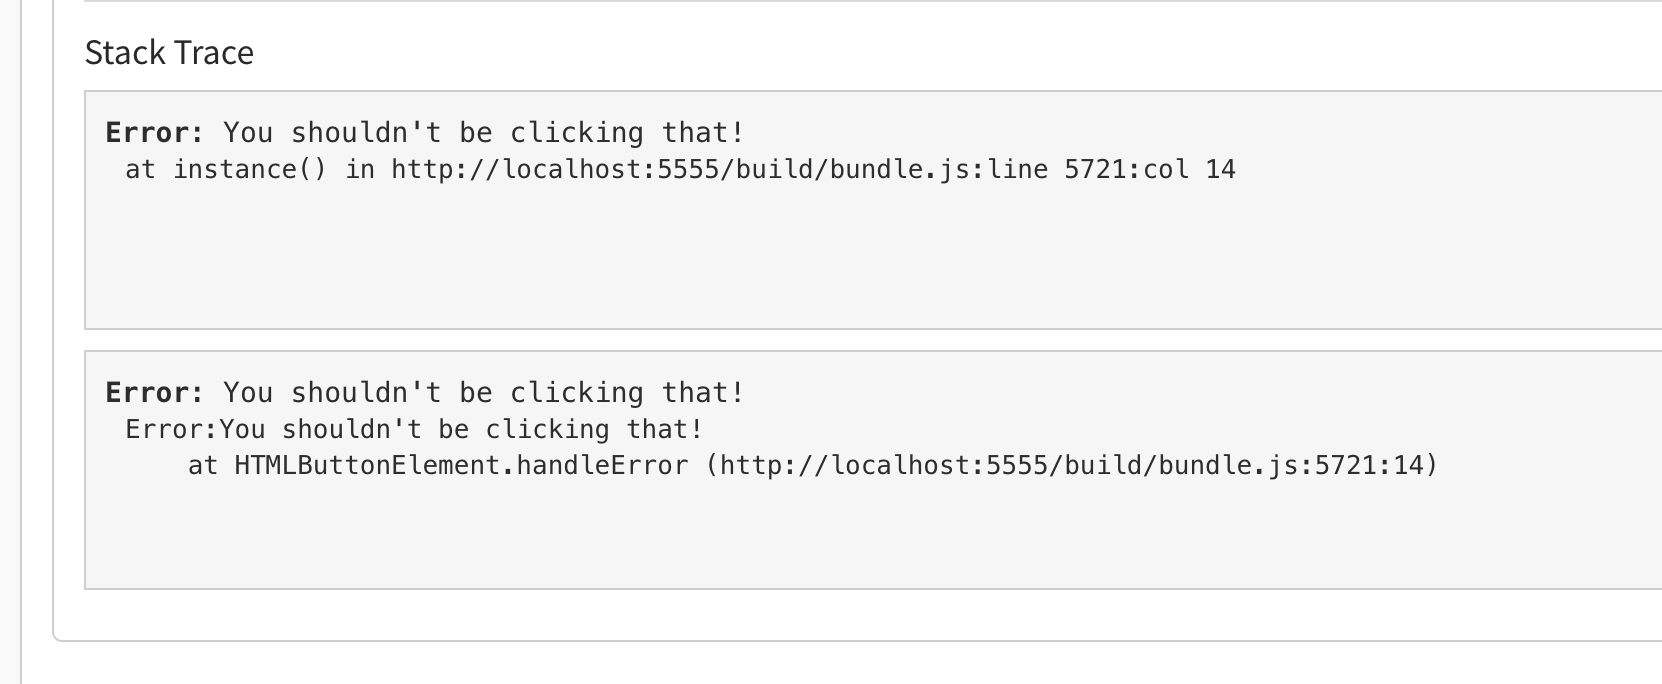
The beauty of this is you can click all the way through that exception and see the details of the error:
Now, what if you do want to handle errors and add in some additional context? Exceptionless has you covered. Create a new function called handleError:
You see in our catch we are adding a lot more info to the event. We are adding a tag letting us know this was a handled error (you would have much better tags, I'm sure). We are also adding a user with a description to the event.
Now, when you click that and go back to Exceptionless, you'll see your event come through. When you click into the details, you'll see the tags and the user information. Pretty cool, huh?
Exceptionless is a powerful, flexible, and open-source event monitoring service. It works well with any language, but with the new JavaScript client, it works especially well with JavaScript apps and frameworks. In just a few lines of code, we were able to automate the collection of feature usage data and send errors to our Exceptionless dashboard.
But it doesn't stop there. You can track just about anything you can imagine with Exceptionless. Svelte plus Exceptionless work...uhhh...exceptionionally well together. Give them both a try today!
If you've ever used any error and event monitoring service, there has probably come a point where you are pulling out your hair trying to figure out if an issue is actually a major problem or if it's impacting just one user. Exceptionless, an open-source event monitoring service, helps with this out of the box by making use of event stacks. But you can extend Exceptionless's functionality and automatically associate users with events. So, that one error that happens 15,000 times a day, maybe it's just a single user who wrote some bad code.
We're going to create a simple Node.js Express server, drop in Exceptionless, then track events with user details tied in. To get started, let's create a new Express project. Fire up your command line terminal and run this command:
If you're not familiar with Express servers, let's take a look at the project structure so understand what we'll be doing. In the project folder, there will be an entry file called app.js. This file tells the server what to do. The express-generator library takes care of setting this up, and it even sets up some example routes for us. You'll see a routes folder with an index.js and a users.js file. Each of those files contain endpoints we can make use of.
In a real project, you'd customize this to your app's needs, but we're going to use what came out of the box with some small alterations. Before we make those alterations, let's install the Exceptionless Node.js client:
npm i @exceptionless/node
Let's take a moment to update our new Express project to use ESM. Start by opening the package.json file. We need to add a line in there that says "type": "module",. You can place this right above the "script" line.
Then, open up your app.js file, and we need to convert our require statements to import statements. You'll also need to update the export at the bottom. Here's what the top of the file should look like:
The export at the bottom should be updated to look like this:
exportdefault app;
Now, we need to make similar changes to our routes files. Open up routes/index.js and change the require statement to import statement like this:
import express from'express';
Then, change the export to look like this at the bottom:
exportdefault router;
Do the same thing in routes/users.js and you'll be all set.
Ok, now we can really dive in. In the users.js file, you can see it comes with a single GET route that will list all users. Let's set up a very simple user mapping in this file. Above the route, add the following:
In a real app, you'd be getting your users from a database, most likely. But we are just trying to highlight Exceptionless's event handling with user attributes, so we can hard-code things.
Now, let's create a middleware function to check the API key on each request to our endpoints. You can add this below the users variable:
This middleware just checks to see if the key provided is a valid API Key. We could log invalid requests here in Exceptionless, but I'd rather us focus on logging valid requests so we can capture the user info.
To test things out so far, let's update the existing GET route to use our middleware and to return a list of users. Change that route code to look like this:
The route now checks for a valid API key, the it returns an array of users with their API Keys removed (security first, kids!). We can try this by running our server and making a simply HTTP request. Open up the entry file, app.js, and add this before the export statement:
app.listen(4000,()=>{ console.log("Server is listening on port 4000"); })
Then start the server:
npm run start
Then in another command line tab, run:
curl --location --request GET 'http://localhost:4000/users'
You should get an unauthorized response which means the middleware is doing its job. Let's add in an API Key:
curl --location --request GET 'http://localhost:4000/users' \
--header 'x-api-key: 123'
Now, you should get back an array of two users with their API keys removed. Perfect! Now we can get started on what we came here to do—associate user data to events tracked in Exceptionless.
Create a new endpoint in that same file that looks like this:
This endpoint allows anyone with a valid API key to add new users. New users should be added without an API. If the request body is empty, we will throw an error. Before wiring this up to Exceptionless, let's test this endpoint out.
But wait, I don't want to have to keep restarting the server when we make changes. Let's make this easier. Kill your server, then run:
npm i nodemon
In your pacakage.json file, add a dev script like this:
"dev": "nodemon node ./bin/www"
Now, restart your server with npm run dev. After any changes to the code, the server will automatically restart.
Ok, now let's test our endpoint without and with a body payload:
curl --location --request POST 'http://localhost:4000/users' \
--header 'x-api-key: 123'
You should get an error back. Now, try with a valid body:
Now, you should get a 200 response with the newly added resource. Ok, we have our endpoint working. Let's connect it to Exceptionless so that we can track events by user.
At the top of your file, require in Exceptionless:
import{ Exceptionless }from"@exceptionless/node"; await Exceptionless.startup("YOUR API Key");
Whenever we have an error where the body payload is invalid, we will now find the user who is making the request based on their API key and assign that user to the event that is reported to Exceptionless.
Let's fire off a bad event again. This time, if all goes well, the user and the event will be reported back to Exceptionless. Run:
curl --location --request POST 'http://localhost:4000/users' \
--header 'x-api-key: 123'
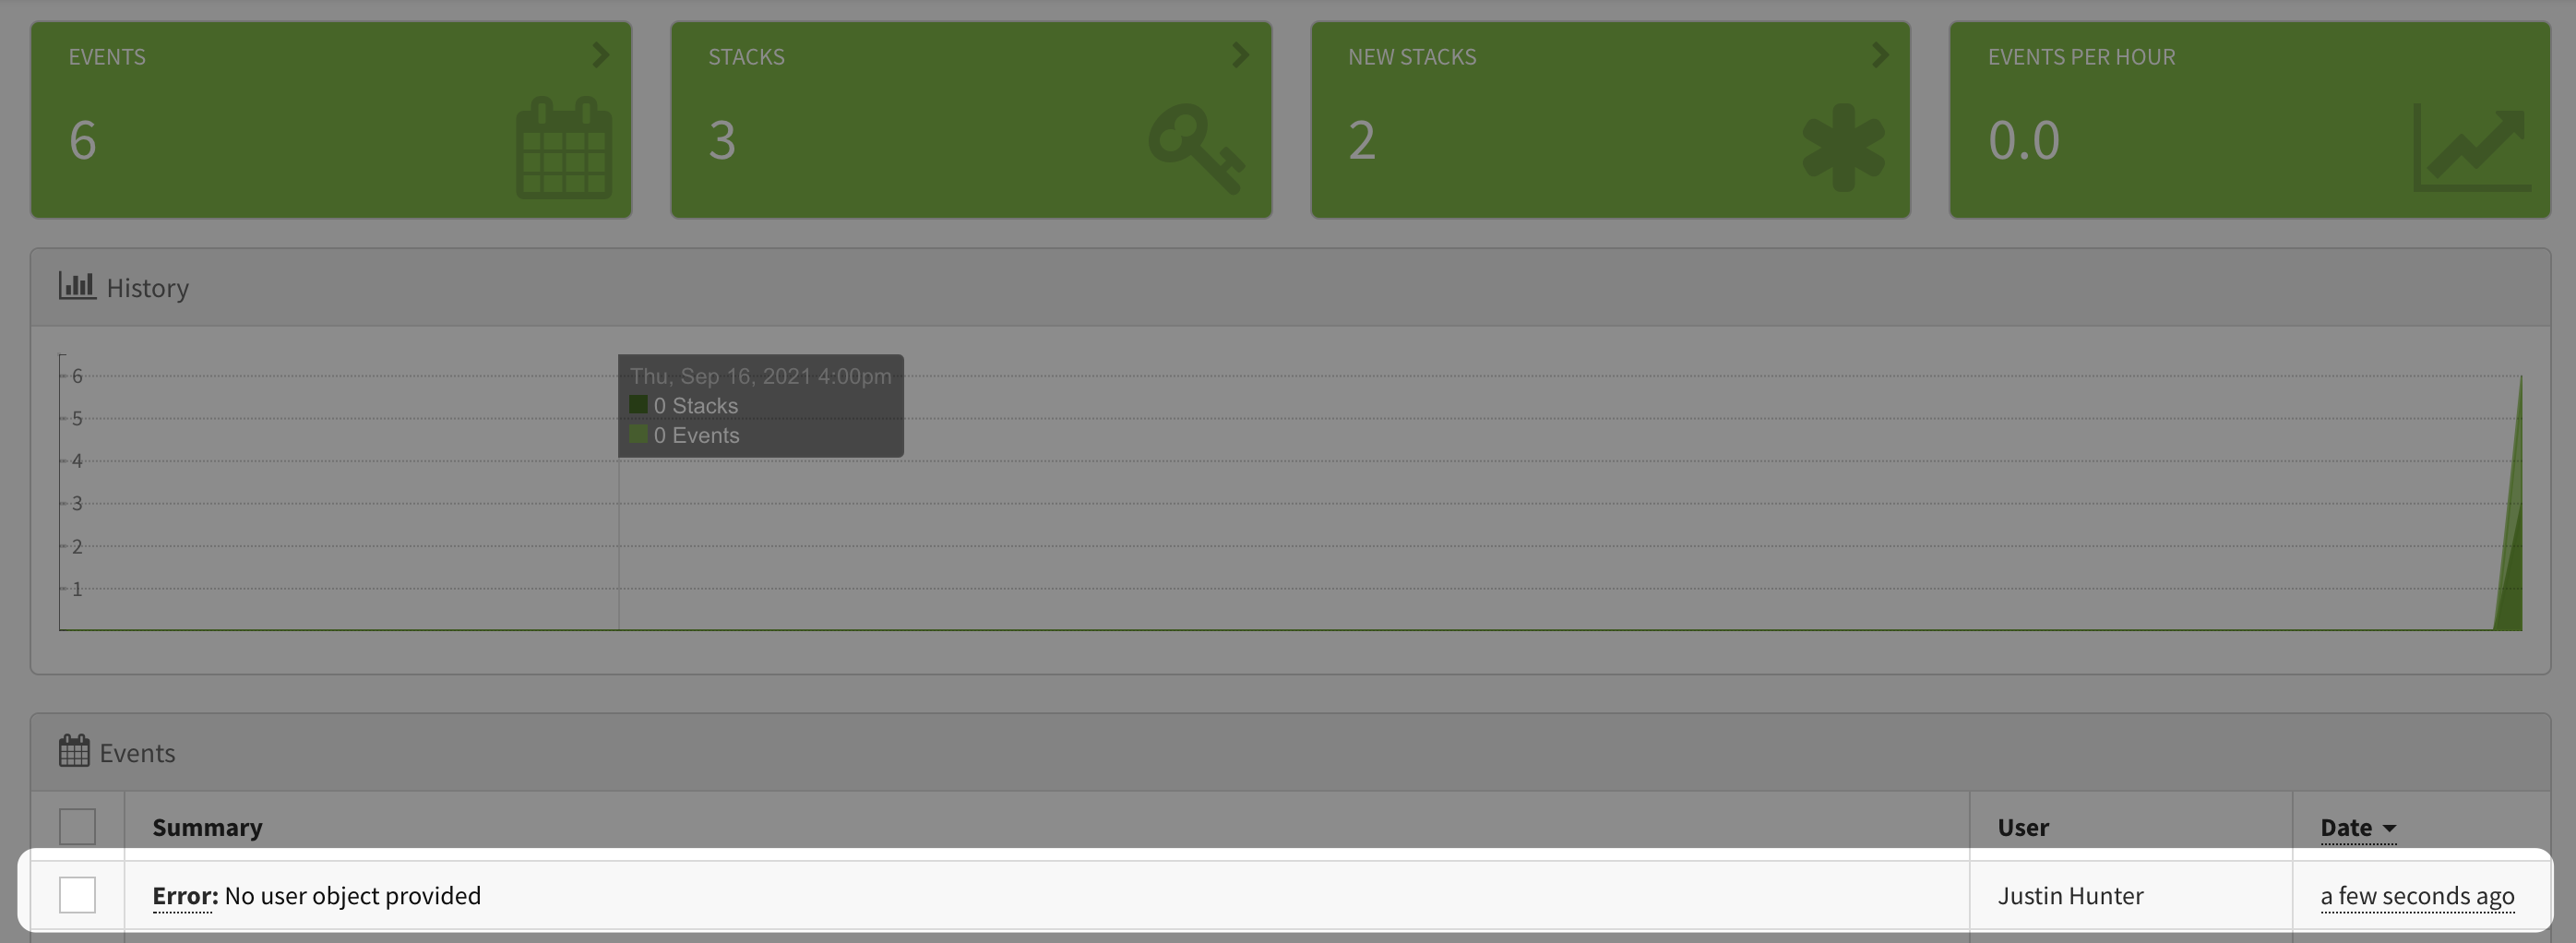
You will get the same error back as earlier, but if you look at your Exceptionless dashboard, you'll see the event came through and is now associated to your user.
Why is this type of data important? Because you can now start to track both errors and events at the user level and make better decisions. Do you need to jump on the bug you just saw come through? Maybe, but first see how many users are impacted. Exceptionless can provide that information at a glance. Just click on the "Most Users" tab on the left.
These events, of course, do not have to be tied to errors. You can track the frequency users are clicking on certain buttons. You can track page views. You can track successful interactions. All of this is powerful information that can help you build a better product.
The source code for this simple server example is in this gist.
If you're ready to jump in, install Exceptionless into your own app, and start monitoring events with user data attached!
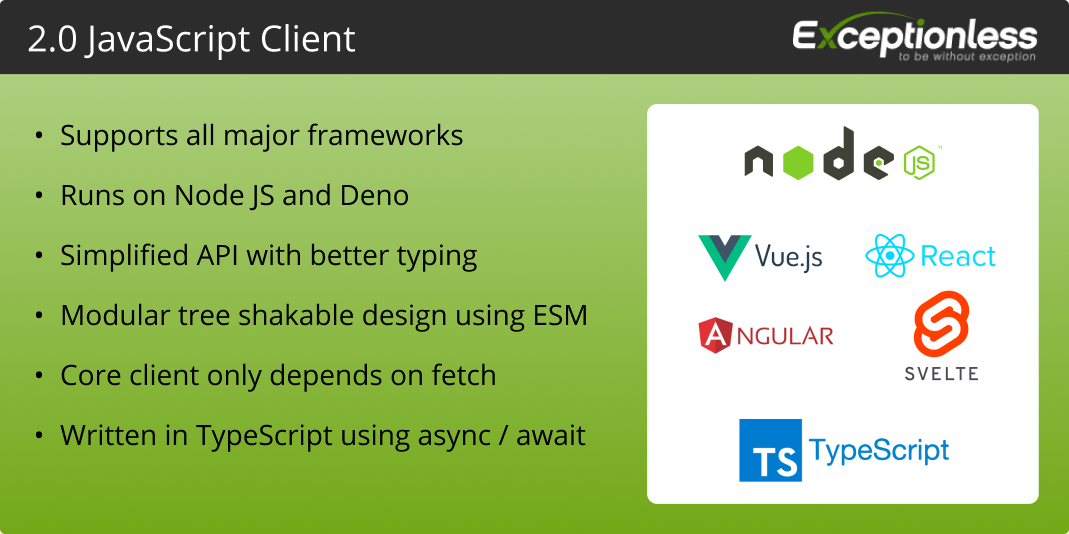
We have had a JavaScript client for several years, but it was quickly becoming out of date. To help address the issues with a fast-moving JavaScript landscape and to extend our JavaScript support, we have recently released a completely rewritten client that supports multiple JavaScript frameworks.
If you just want to dive into the documentation, you can review that here. If you want the story behind the rewrite, let's talk about some of the challenges we wanted to solve.
Support for additional frameworks
Bring the client up to modern JavaScript standards
Have a little more code separation
Provide a better developer experience
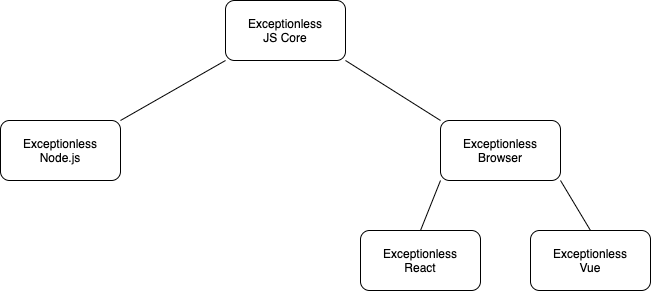
We'll talk about each one of these points in a little more detail. But first, let's dive into the architecture a bit.
Everything starts with Exceptionless JS Core. From there, we extend into specific environment implementations. The Node.js environment has different requirements than tha browser environment. Framework-specific environments like React and Vue have different requirements than the browser environment. By starting with the Core JS implementation, we can extend in any direction to any framework.
When Exceptionless launched, the JavaScript ecosystem was powered by Bower, front-end applications were built with jQuery, and supporting IE6 was a legitimate concern on the minds of many developers. Over time, the ecosystem grew. We got React, Vue, Express, Typescript support became popular, and React Native made it easy for web devs to jump into building mobile apps.
While Exceptionless continued to work well for most use cases, it was clear we needed an updated client to support the exploding ecosystem. React Native was one of our specific targets because Exceptionless's JS client flat-out couldn't work in React Native. But while we were at it, we wanted to make Vue.js support easier, add some native React functionality, and more. What we arrived at is a more robust client with individual sub-clients for various frameworks.
Bring the client up to modern JavaScript standards #
ECMAScript has progressed a lot in the last ten years. It was clear that we would need to re-write our client to keep up. With our new implementation, it will be much easier to stay on top of new features and experimental features.
The JavaScript client is a set of ESM modules built on modern JavaScript, so Exceptionless is set now and into the future.
This is not a question of monorepo or not. Instead, we recognized that we were trying to cover browser code and server code all in one package. This made things difficult, not to mention we didn't yet have support for specific frameworks (besides Angular 1.0).
Since we knew we were going to extend our support, it made sense to rebuild the client in a way that allowed us to publish updates to specific sub-modules rather than to the entire core JavaScript client every time.
Developers are at Exceptionless's core. We are developers. We are part of the open-source community. Everything we build should make life easier for developers.
This new version of our JavaScript client makes things significantly easier. Developers can reach for a specific client module, like Vue.js for example, rather than trying to shoehorn in a vanilla JavaScript client. React developers now have Error Boundary support built into the Exceptionless client. React Native developers can now use the client instead of writing raw API requests on their own.
It took months of work, but the new Exceptionless JavaScript client is a completely rebuilt, all-new solution to event monitoring in JS. Exceptionless is proud to support the vibrant JavaScript ecosystem, and we believe this release positions us to update and stay ahead (or as close to ahead as anyone can get) of new JavaScript standards and updates into the future.
Backend engineers have all the tools. Nice error handling. Reporting. Metrics. What about us frontend devs? Sure, we can catch errors in our functions, but what about errors in our presentational code? Take React for example. Write some bad code in your function component and the whole app crashes.
Fortunately, frontend devs are getting more and more tools to help them with error handling. In fact, with the release of React 16, a new tool was added to the toolbox designed to specifically handle errors in components. Error Boundaries allow developers to catch and handle errors in the presentational layer of React applications. From the React team's announcement:
In the past, JavaScript errors inside components used to corrupt React’s internal state and cause it to emit cryptic errors on next renders. These errors were always caused by an earlier error in the application code, but React did not provide a way to handle them gracefully in components, and could not recover from them.
That all changed with React 16. However, if you wanted to recover from a presentational layer error AND report it, there wasn't anything out of the box to help you. This is where Exceptionless (an open-source error handling and monitoring tool) and React work really well together.
Let's run through a quick tutorial that creates a React app that does the following:
Creates an Error Boundary
Forces an error in a function component
Recovers from that error
Reports it to our monitoring service (Exceptionless)
With those things in place, let's generate our React app. From the command line, run the following:
npx create-react-app error-boundary-example
When your app is created, change into the directory and install the Exceptionless React package:
cd error-boundary-example && npm i @exceptionless/react
This should get you set up with an app and the required package. Now, let's write a bit of code to show off the functionality. We'll walk through setting up an Error Boundary first.
The first thing we need to do is create an Error Boundary file. This will act as a wrapper component for the rest of our application. In src folder of your React application, create a new file called ErrorBoundary.js. This will allow us to render a fallback when we hit an error in our component. We'll use Exceptionless's built-in Error Boundary to actually handle reporting the error. You'll see that soon, but let's focus on rendering the fallback for now.
render(){ if(this.state.hasError){ return( <div> <h1>Uh oh!</h1> <p> This wasn't supposed to happen. If you continue to see this message, please reach out to support. </p> </div> ); }
returnthis.props.children; } }
exportdefault ErrorBoundary;
This file will, again, wrap our main application code. So it will work throughout all of our components. If there's an error in a component, rather than totally crashing the application, it will render what we have in our render method here. You can change this to include whatever styling and information you'd like. I kept mine pretty simple.
Now, we need to connect this to our application components.
You may have many providers in your application that all wrap your main App component. That's OK. This new Error Boundary component will simply wrap everything at the top level. Go to your index.js and update your file to look like this:
Now, before we handle reporting the error to Exceptionless, let's make sure this code works. Start up your application with npm start. We need to force an error. So, go into your App.js file and add an undefined variable into your component body:
You can see I've added undefinedVariable into the component. Because that variable is, well, undefined, the component will break. Save your code and check out the app. You'll see...
...an error message still. What gives?
Well, in development mode, React is going to try to help you out by rendering the error on screen. If you refresh the page, you should see your fallback component render for a split-second before the error appears on screen. When this code is deployed to a production environment, the error won't be displayed on screen. You know this because you've seen your production React apps crash. We all have. It shows a white screen. That's it. Now, though, your app will show the fallback screen.
Pretty cool!
Now, we need to make sure the error is reported back to our monitoring system. We will surely get emails from customers about this, but having the details handy might help us solve the problem before our support team can even get to those emails.
Now that we can display a message, Let's work on capturing the error and sending it to our reporting system—Exceptionless.
The Exceptionless React package includes an Error Boundary helper called ExceptionlessErrorBoundary. All we need to do is import this into our index.js and wrap our App component with it. You'll need to grab yourself an API key from your Exceptionless account for this. You can follow this guide to do so.
Let's take a look at what the code looks like. This is what you should update your index.js file to look like:
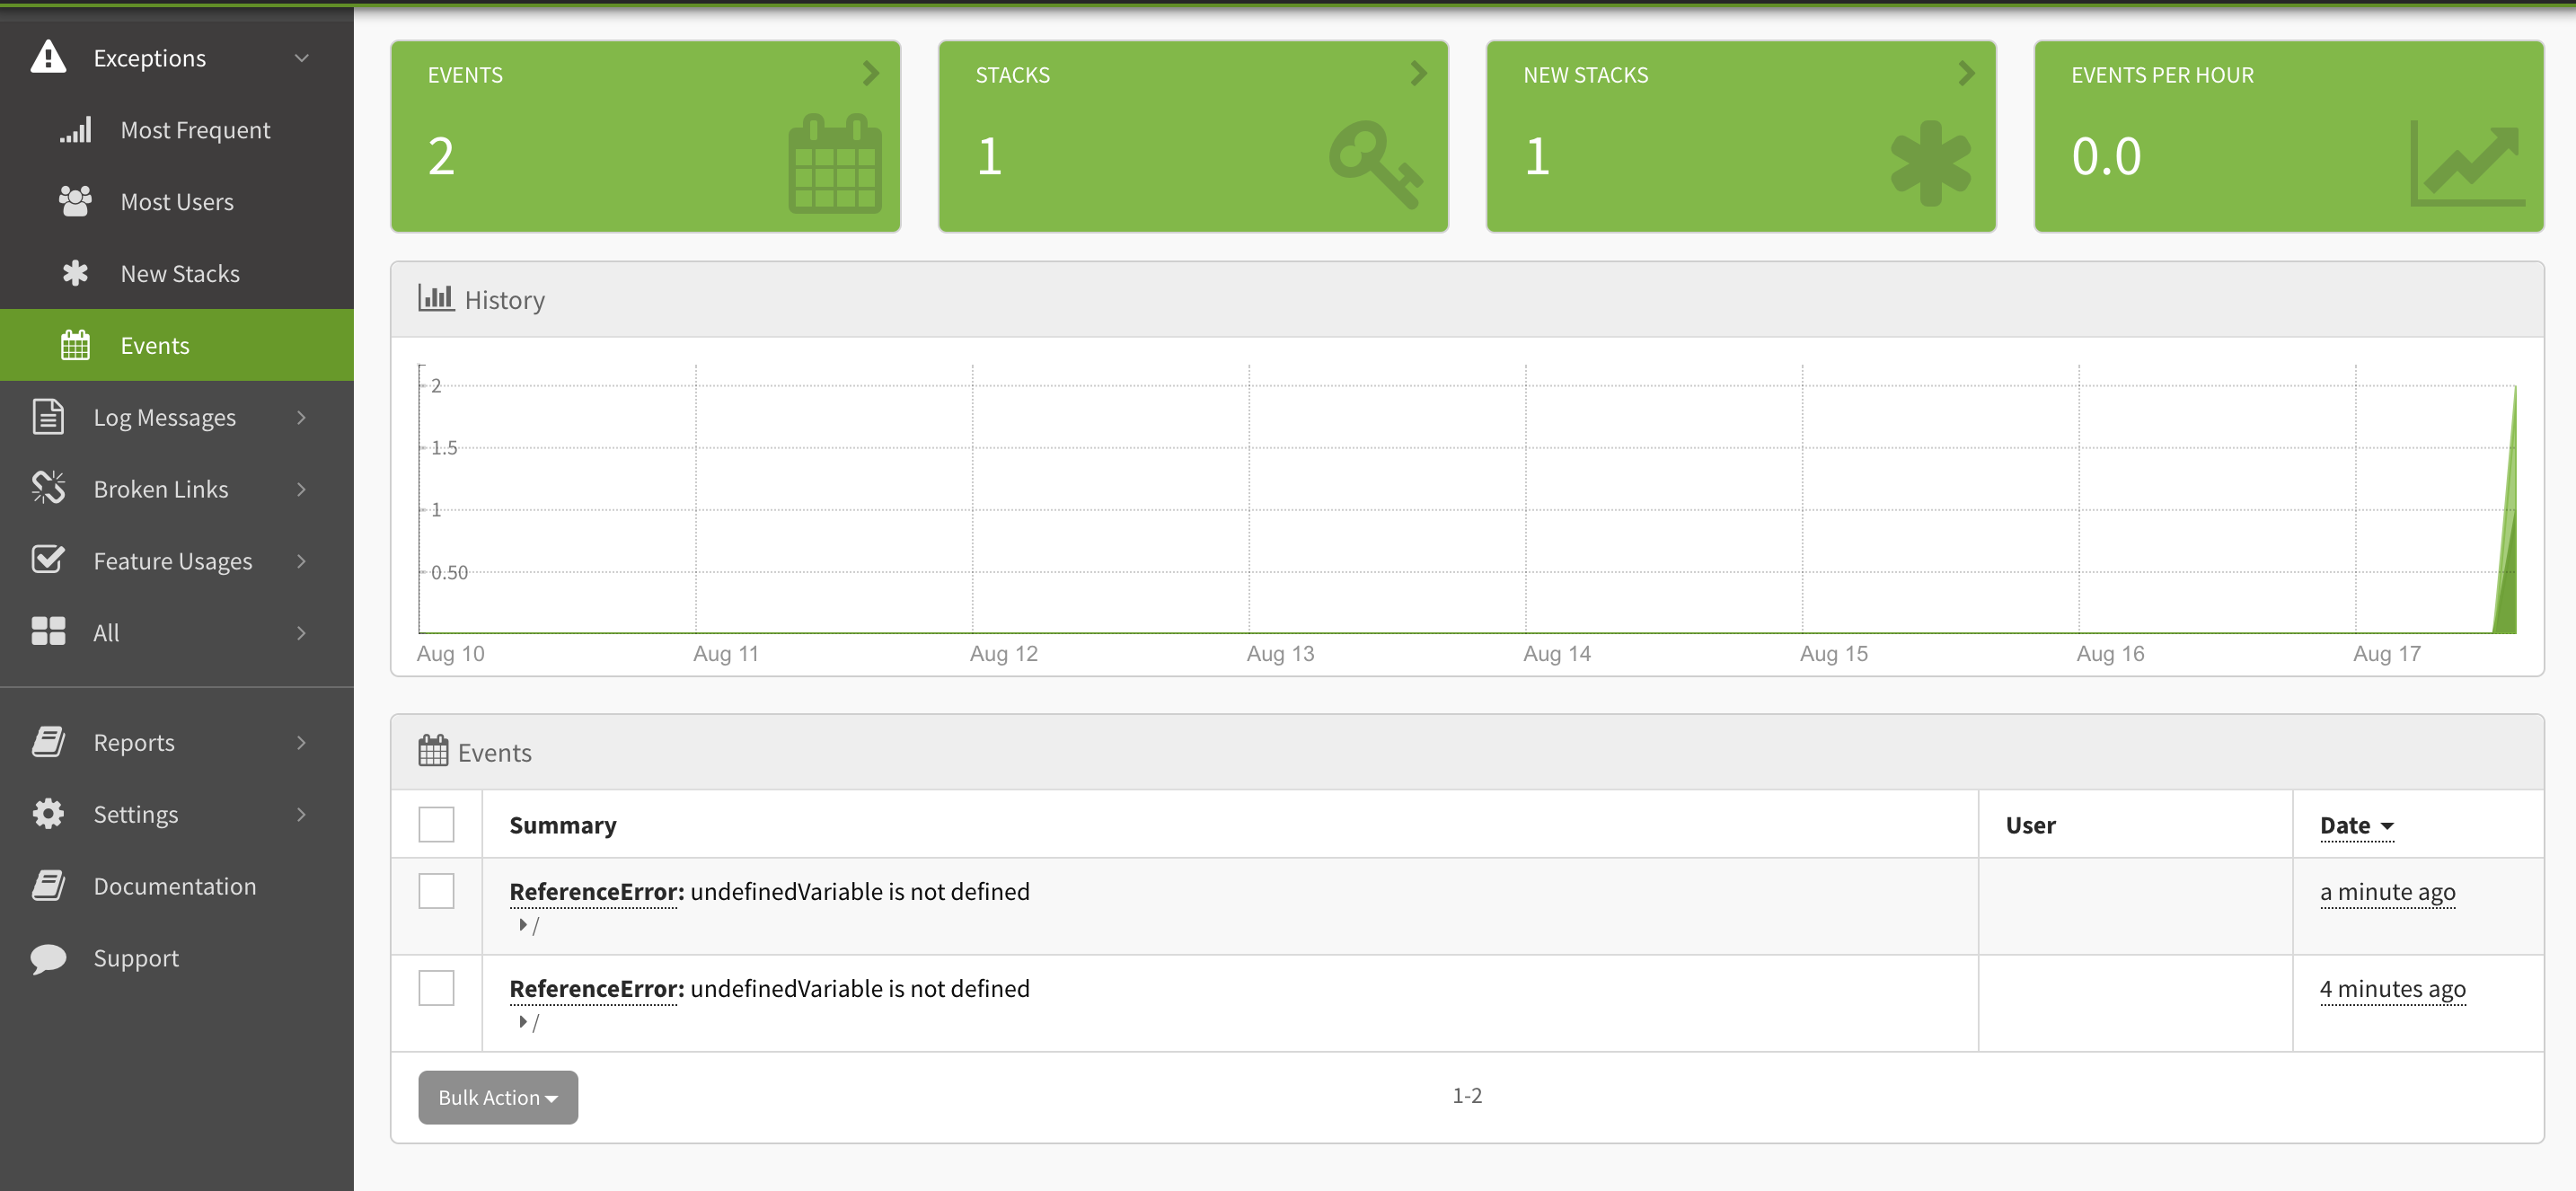
Now go back to your React app and re-load. You won't necessarily see it there, but the error event was sent to Exceptionless. Open up your Exceptionless dashboard and take a look at the Exceptions events:
You can click into your exceptions to get more details. In this case, we will see what the variable was and the full stack trace for our React app.
Error Boundaries in React are powerful tools in helping you debug and quickly fix your applications. You can see how quickly we set this up to not only render a fallback UI and to report to an error monitoring service. You could write even less code and only report the error if you wanted to, but I'll leave that up to you.
There are plenty of error monitoring services out there that you can plug this into, but if you're interested in an open-source solution, get started with Exceptionless today.
Go does not have the concept of exceptions. Welp, I guess Exceptionless doesn't apply. Let's pack it up and head home, everyone.
Kidding, of course. While Go really doesn't have the concept of exceptions, errors still happen in Go codebases, and those errors need to be handled. Having recently built an Exceptionless client in Go, we had the opportunity to take a deep dive into the Go programming language, and we'd like to share some of what we discovered along the way.
Let's take a quick look at why the Go programming language doesn't have exceptions, and then we can dive into how we work around this. From the Go FAQ:
We believe that coupling exceptions to a control structure, as in the try-catch-finally idiom, results in convoluted code. It also tends to encourage programmers to label too many ordinary errors, such as failing to open a file, as exceptional.
Essentially, Go doesn't want any scrubs (try/catch paradigm) hanging out the passenger side of their best friend's (that's you) ride trying to call things exceptions. Not everything is fatal. Not everything is an exception. Errors can happen without being so extraordinary to be considered an exception. As such, Go made the opinionated decision to simply not acknowledge exceptions as a construct.
For those instances where an error is truly catastrophic, Go has some build in mechanism to handle and recover. Those are documented here.
So with no exceptions, how should errors be handled when using Exceptionless?
Just because there are no exceptions doesn't mean there are no errors. Fortunately, Go has a well-documented paradigm for handling errors without the need for something like an exception.
Every function you write in Go can have multiple return values. So, a well-written function will return both an error and the actual function's response. Let's take a look at a very basic example of this.
package main
import( "github.com/go-errors/errors" )
funcCombineStrings(string1 string, string2 string)(string,error){ var errToReturn error
if string1 ==""|| string2 ==""{ errToReturn = errors.New(fmt.Sprintf("Strings must have at least one character")) }
In this example, we are using the go-errors module to build an error of the type error. We do a simple check to see if both of the string arguments to our function are not empty. If either is empty, we assign an error to the variable errToReturn. Then, in our return statement, we return both the expected return value of the function and the error.
When calling this function, the developer needs to first check for an error before moving on. That might look like this:
If an error is so bad that your code cannot execute any further, you may want to call Go's built in handler, panic, like this:
if err !=nil{ panic(err) }
Ok, So How Do We Use Exceptionless in an Exceptionless Environment? #
Exceptionless (that's us) is a way of thinking about your code. It does not actually rely on the concepts of exceptions. In fact, Exceptionless is so much more than error/exception handling.
So, with that framing, it becomes a lot more clear that Exceptionless can very easily be used within Go code to handle errors. In fact, the structure for using Exceptionless in Go is not all that different from other programming languages.
We have a (currently as of the writing of this post) beta version of a Go Exceptionless client. You can find that here. I'll show you how to use the client, but do note that the client API could change until it's out of beta. The goal here is less about showing off the Go client and more about showing you how to handle errors with an event monitoring service within Go.
The first thing you'll need to do is sign up for Exceptionless and get an API Key. You can sign up here. Once you've done that, you'll need to install the Exceptionless Go client in your project. To do so, simply run the following:
go get https://github.com/exceptionless/Exceptionless.Go
Once that's installed, import it into your project like this:
Now, let's take a look at how we would use the client. On app startup (probably in your main function), you can initialize and configure the client like this:
funcmain(){ config := exceptionless.Exceptionless{ ApiKey:"YOUR API KEY" } exceptionless.Configure(config) }
With the Exceptionless client configured, you can now use it to handle all sorts of events in your app. We're going to focus in on exception—or, not exceptions as the case might be with go 😉.
Let's use our example function from earlier as the example.
If you remember the CombineStrings function will return an error if either string is empty. So in my mock function SomeOtherFunction, I am calling CombineStrings and passing in an empty string. When the error comes back, all we need to do is handle it with Exceptionless using exceptionless.SubmitError(). Simple as that.
There is a lot more you could do. The Exceptionless Go client allows you to build custom events with more info. You could even bypass the client entirely and make an http request directly to the Exceptionless API in your error handler.
But the point is, despite Go being an exceptionless programming environment, you can catch errors and report them. So that means Exceptionless is actually a match made in heaven for the exceptionless environment of Go.
Swift, best known as the programming language that enables iOS, iPadOS, and macOS developers to build apps, has been growing in popularity over the years. As of February of 2020, it had leaped into the top-10 of most popular programming languages. While Swift can be used for more than just Apple platform products, we're going to keep things simple today and focus on how to set up event monitoring with Swift in an iOS app.
If you don't already have Xcode installed on your Mac, do so now. You can grab an install here. If you already have it installed, you will need to make sure you are upgraded to Xcode 12. To check your version, open Xcode and check to see that you have version 12 or above. It'll look like this:
Once you're done installing it, you can check that everything was successful by either firing up Xcode or running the command I showed above. Now, we need to make sure you have the Xcode command line tools. These should be installed automatically when you install Xcode, but we want to be sure. To check if these were installed, run the following in Terminal:
xcode-select -p
If a path is printed out, you're all good. That's all you need. Open up Xcode, and we'll get started.
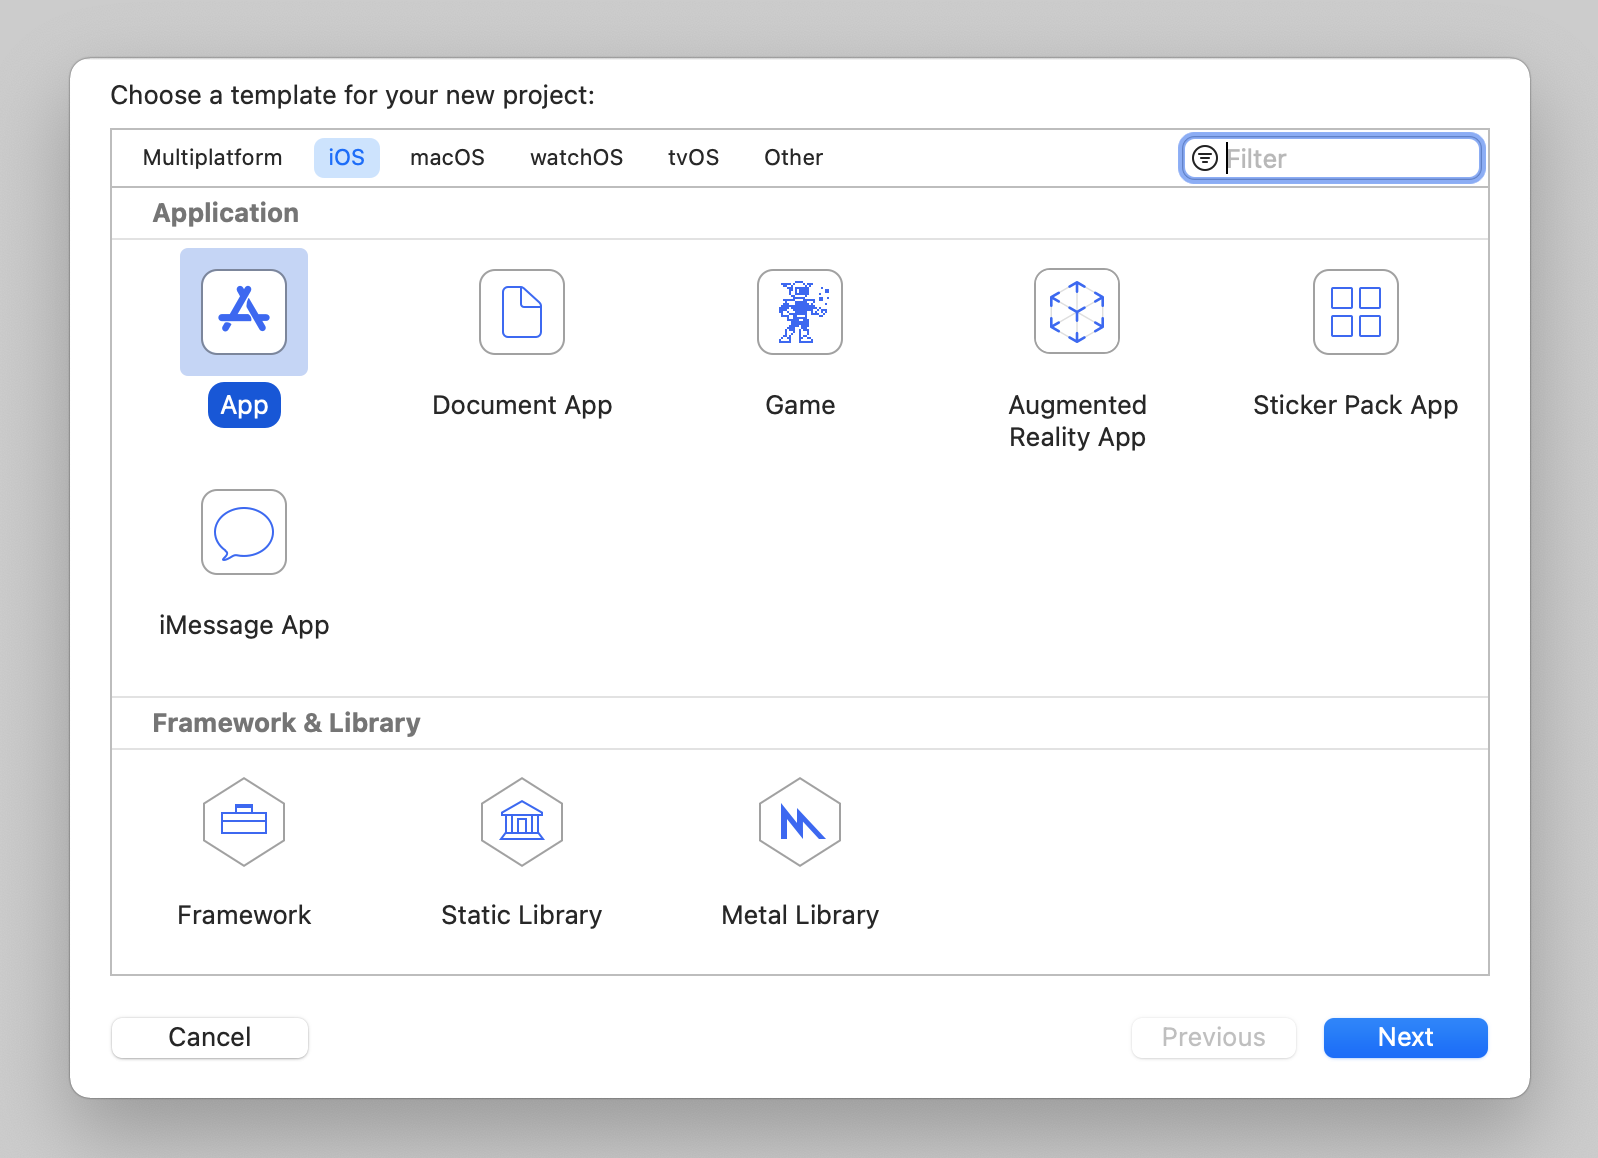
Once you've opened Xcode, you're going to create a new project. Choose iOS and choose App, then click Next.
Next, you'll give the app a name in the Product Name section. I'll call mine Exceptionless Events. Make sure your interface is SwiftUI, your lifecycle is SwiftUI App, and your language is Swift. Then, click Next.
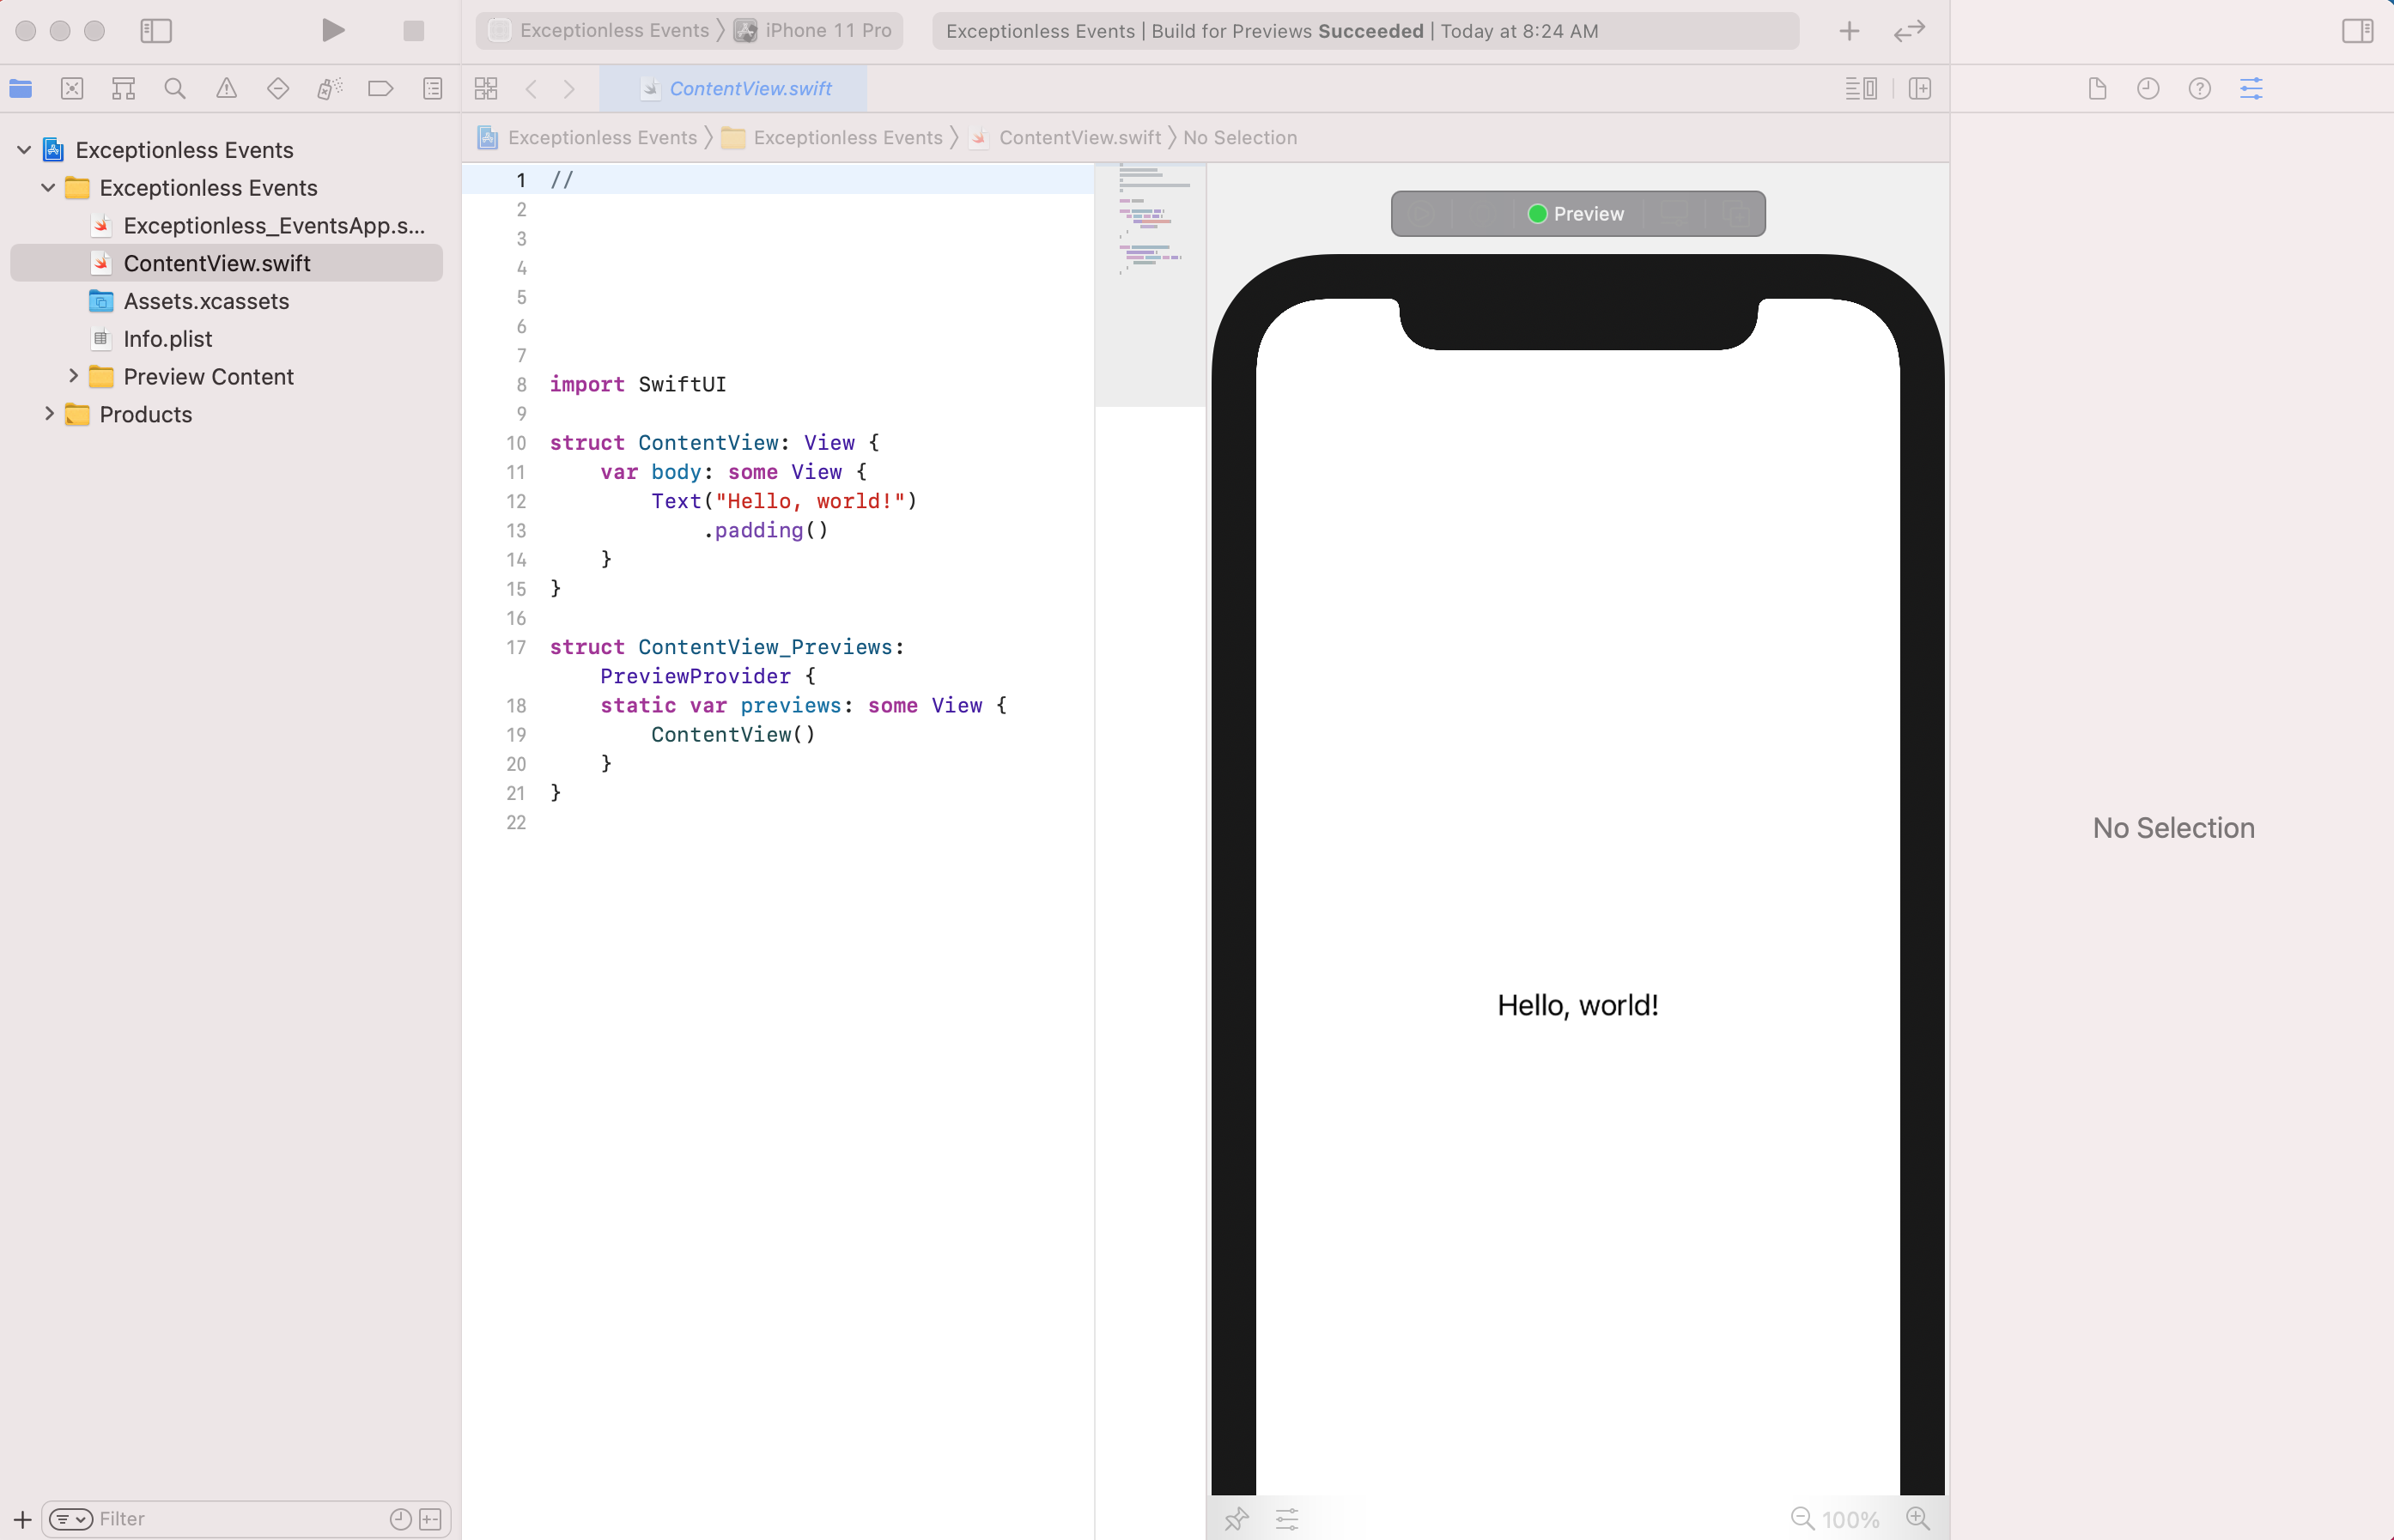
You'll be asked where you want to store your code. Choose a folder that makes sense for you. When you've done that, your new project will load up. It should look like this:
We're not going to spend a lot of time building an actual iOS app here, but we'll add enough functionality to test errors and test logging events. To set ourselves up, we're going to create two buttons in the UI. So, inside your ContentView.Swift file, replace the Text element with this:
Note: the Spacer items are just there to make the screen a little more manageable (not necessarily prettier). Each button has a label and each has an action. However, the actions don't do anything just yet. We'll get that taken care of next.
Above your body declaration, add these two functions:
Just to test that everything is working, click the play button at the top of the Xcode window. This will build the app and launch a simulator. Click each button and make sure "event" and "error" print out in the console. Pro tip: the console may be shrunk down and hidden. At the bottom of your Xcode window, hover over the section that looks like this and drag to increase the window size so you can see the console.
Assuming all is working, we can move on to using Exceptionless!
We're going to handle all of the event processing and posting through a single class. You may want to refactor into multiple classes in a production project, but this will get the point across, I think.
Let's create a new file. In the file menu bar, click File, New, File, and be sure to choose a Swift file and not SwiftUI. Let's name the new file Exceptionless.swift.
Inside that file, we're going to create our Exceptionless class. Add the following so your file looks like this:
importFoundation
classExceptionless{ var apiKey:String init(apiKey:String){ self.apiKey = apiKey }
This class doesn't do anything besides accept the Exceptionless API key, but you can see we're starting to frame out how to build our event monitoring system. To keep things simple, the submit function accepts a type of event (in string form) and it accepts the event string. The event string for the purposes of this example should be a simple log message or error message.
Let's test what we have out so far. We want to connect our two buttons from earlier to the function, submit, that we created in the Exceptionless class. We should see the console print out "log" or "error" depending on what button we press.
Back inside your ContentView.swift file, replace the actions for each button like this:
var body:someView{ VStack{ Spacer() Button(action:{Exceptionless.init(apiKey:"YOUR API KEY").submit(type:"log", event:"Log Message")}){ Text("Log Message") } Spacer() Button(action:{Exceptionless.init(apiKey:"YOUR API KEY").submit(type:"error", event:"Log Error")}){ Text("Log Error") } Spacer() } }
This is a very simplified example. In reality, your buttons would be calling some other action and you'd be catching errors or logging events dependent on what that action does. Let's test this out, though. We don't actually need an API Key yet, so leave the apiKey string as is. Run your project on a simulator and click each button. You should see "log" and "error" printed in the console.
Congratulations! You just built a class within Swift that will act as the framework for submitting events.
We're going to keep things simple. The Exceptionless API has some great documentation and some simple examples that we'll be making use of. Let's start by updating out switch statement to actually call the functions specific to events or errors:
You can do whatever you'd like with your default case. I'm going to keep it as a print statement, though. What we've done is we've said if we call submit with a type of "log", we will call the logMessage function. If we call submit with a type of "error", we will call the logError function.
Let's build out the logMessage function fist. Replace the existing empty function with this:
privatefunclogMessage(logMessage:String){ let now =Date() let formatter =ISO8601DateFormatter() let datetime = formatter.string(from: now) let eventDictionary :[String:Any]=["type":"log","message":logMessage,"date": datetime ] let jsonData =(try?JSONSerialization.data(withJSONObject: eventDictionary, options:[]))! let jsonString =String(data: jsonData, encoding:String.Encoding.ascii)! print(jsonString) }
Because the Exceptionless API takes JSON body payloads, we want to build our event into JSON. To do that, we first start with a dictionary. As you can see, we are creating an eventDictionary which is simply keyvalue pairs in string format. We add in the date in ISO format so we know when our events happen. The actual event message is what we passed in all the way back from when we clicked the button.
We take that dictionary and convert it to JSON with Swift's built-in JSONSerialization function. Before posting to the API, let's take a look at the output in the console and make sure we're happy with it.
Build and run the app, then click "Log Message". You should see the following printed in the console:
Ok, we've gotten this far. Let's build our error function. Don't worry, we'll come back and think about how we want to actually post these events to Exceptionless.
Replace the empty logError function with this:
privatefunclogError(errorEvent:String){ let now =Date() let formatter =ISO8601DateFormatter() let datetime = formatter.string(from: now)
let errorDictionary :[String:Any]=["message": errorEvent,"type":"System.Exception"]
let errorJson =(try?JSONSerialization.data(withJSONObject:errorDictionary, options:[]))! let errorJsonString =String(data: errorJson, encoding:String.Encoding.ascii)! let eventDictionary :[String:Any]=["type":"error","@simple_error":errorJsonString,"date": datetime ] let jsonData =(try?JSONSerialization.data(withJSONObject: eventDictionary, options:[]))! let jsonString =String(data: jsonData, encoding:String.Encoding.ascii)! print(jsonString) }
You'll see this function is very similar to the logMessage function. However, we are nesting data in our JSON, so we need two dictionaries. We use one dictionary to house the "@simple_error" and another to house the entire event. In other words, nest the JSON version of our errorDictionary inside the JSON version of our eventDictionary.
Let's build and run the app and try both buttons. You should see the following printed out:
Your dates will be different, but the rest should look about the same. We now have a Log Event AND an Error Event. I think we're ready to post to the Exceptionless API.
Remember, if you haven't done so, you'll need to sign up for a free Exceptionless account, create a project, and grab an API Key.
When we post to the Exceptionless API, we are posting JSON data. In the examples above, we are printing the JSON string version of what we will ultimately push to the API. Let's see how it will look when actually posting to the API.
Within our Exceptionless class, let's create a new private function called postToAPI.
privatefuncpostToApi(event:Data){ let url =URL(string:"https://collector.exceptionless.com/api/v2/events")!
var request =URLRequest(url: url) request.httpMethod ="POST"
// insert json data to the request request.httpBody = event request.setValue("application/json; charset=utf-8", forHTTPHeaderField:"Content-Tye") request.setValue("application/json; charset=utf-8", forHTTPHeaderField:"Accept") request.setValue("Bearer "+self.apiKey, forHTTPHeaderField:"Authorization")
let task =URLSession.shared.dataTask(with: request){ data, response, error in guardlet data = data, error ==nilelse{ print(error?.localizedDescription ??"No data") return } let responseJSON =try?JSONSerialization.jsonObject(with: data, options:[]) iflet responseJSON = responseJSON as?[String:Any]{ print(responseJSON) } }
task.resume() }
Walking through this new function, let's take a look at what's going on. First, we are setting the URL for our API request. This is a hardcoded value and probably not something you'd want to do in a production application.
Next, we are creating a new request and assigning values to the request. You'll note that our postToAPI function accepts a Data value argument called event. That is what we will be posting to the API and it represents the JSON version of the event we build when we click Log Message or Log Error.
Then, we set header values for our request. Take note, that we are assigning the Authorization value by using our Exceptionless API key. We'll need to get that key from Exceptionless before actually sending events. \
Finally, we are posting the request using URLSession.
To actually call this function, we need to make two minor changes. First, back in your ContentView.swift file, we need to add our Exceptionless API key in where we left placeholder text. Again, this is not how you'd assign the API Key in a production app, but it's a simple example to get you going.
Now, back in the Exceptionless.swift file, let's update both the logMessage and logError functions. Instead of converting our event to a JSON string, we're going to leave it as JSON and pass it through to our postToAPI function like this:
privatefunclogMessage(logMessage:String){ let now =Date() let formatter =ISO8601DateFormatter() let datetime = formatter.string(from: now) let eventDictionary :[String:Any]=["type":"log","message":logMessage,"date": datetime ] let jsonData =(try?JSONSerialization.data(withJSONObject: eventDictionary, options:[]))! postToApi(event: jsonData) }
And here's the logError function:
privatefunclogError(errorEvent:String){ let now =Date() let formatter =ISO8601DateFormatter() let datetime = formatter.string(from: now)
let errorDictionary :[String:Any]=["message": errorEvent,"type":"System.Exception"]
let errorJson =(try?JSONSerialization.data(withJSONObject:errorDictionary))! let errorJsonString =String(data: errorJson, encoding:String.Encoding.ascii)! let eventDictionary :[String:Any]=["type":"error","@simple_error":errorJsonString,"date": datetime ] let jsonData =(try?JSONSerialization.data(withJSONObject: eventDictionary))!
postToApi(event: jsonData) }
Go ahead and build and run your app. Click the Log Message button and then the Log Error button. You won't see anything printed in the console, but if you go into your Exceptionless dashboard, you should see a new log and a new exception.
Congratulations! You just built a simple event monitoring service in native Swift code. You can extend this pretty easily thanks to the Exceptionless class and leverage it in a production application.
Swift is a fun language, but when using it to build mobile applications, it can be difficult to debug and track events. Exceptionless can help, and hopefully this tutorial shows how to implement such event tracking in SwiftUI and Swift.