Exceptionless is powered by a REST API. When you interact with the dashboard UI, when you use the .NET client, and when you use the JavaScript client, you are interacting with the REST API. It is well-documented, and it can be used without any client libraries. This paradigm makes it simple for developers to create their own wrappers around the API. In fact, we recently started work on building an official Go client for Exceptionless. Along the way, we learned some tips and tricks that may be helpful for others that want to build clients and SDKs in Go that wrap RESTful APIs.
First, a little about Go. Go is a statically typed language, built originally by the folks at Google. Go, while close in syntax to many other statically typed languages, differs in that it is no object oriented. Go is also very well suited for gRPC APIs, but that does not prevent it from being used with REST APIs, as we'll see here today.
In order to build our Go client, we will need to have Go installed. Honestly, this can be the hardest step as it involves setting environment variables and updating your profile source PATH. So rather than risk confusing you with the steps to install Go and get started, I'm going to simply point you to Go's official install instructions.
Once you've installed Go, you will need to have a text editor handy so that we can write our new Go code. From the command line, create a new folder and call it "go-rest". Change into that directory, and let's start writing some code.
In Go, you will always have a main.go file which acts as the entry point for your source code. We need to set that up first, so let's do that now. In the root of your project folder, create your main.go file. Inside that file, let's start by declaring our package and importing a module. Add the following:
package main
import("fmt")
Your file won't do anything yet, but we're laying the groundwork. We have declared our package as main, and we have imported the built-in fmt library from Go for formatting.
Next, we need a main function, so let's create that. Add the following below your import statement:
funcmain(){
fmt.Println("Hello, world")}
This is the example program Go's example docs show, so we might as well run it. From your command line, inside your project directory, run this command:
go run .
You should see Hello, world printed in the command line terminal window.
Now that we have the fundamentals down, let's talk about how Go works so that we can build our REST API client. You can include as many functions in your main.go file as you'd like and you can call those function from within other functions. But, like any other programming language, it's probably smart to separate code to make it easier to work with.
The nice thing about Go is that when you create a new file, that file is automatically available from any of your other files as long as they share the same main package.
Since we are building a REST client, it probably makes sense to create a file that would handle all our API routing request. So, create a file in the root of your project called api.go.
Inside that file, make sure to reference the main package at the top like this:
pacakage main
We are also going to import a couple packages here as well, so your file should look like this:
package main
import("bytes""log""net/http")
These packages are all built into Go itself. You can install external packages as well, and we'll explore that soon.
Now that we have the start of our API file, it's good to think about what our client needs to do. With a REST API, you may have the following request methods:
GET
POST
PUT
DELETE
PATCH
You may not need all of these for your client, but it's good to know that they exist. In our case, we are going to implement the GET and POST methods and with those as a template, you should be able to extend your code to implement PUT, PATCH, and DELETE.
Let's start by building the POST method since its the backbone of our client. In your api.go file, below the import statement, add the following:
In our real-world use case, we are making requests to the Exceptionless API, so we know the post body needs to be a JSON string. This is why the postBody is of type string. If your API is expecting a different format, make sure you type your variable properly here. The other two arguments in our Post function are pretty self explanatory. The endpoint string is the endpoint on your API you want to call. The authorization string is the token/API key needed to authenticate into the API. You could choose to handle the authorization differently, if you wanted. For example, if your API expected basic authentication, your authorization variable might be a string mapping of username and password.
One of the tricks here is if you are sending JSON to your REST API, you will need to convert the body into a format the http client library within Go can handle. We're doing that with the bytes.NewBuffer(jsonStr) call.
Now, let's put together our GET function:
//GET makes api GET requestsfuncGet(endpoint string, authorization string)map[string]interface{}{
baseURL :="YOUR API URL/"
url := baseURL + endpoint
httpClient :=&http.Client{}
req, err := http.NewRequest("GET", url,nil)if err !=nil{
fmt.Println(err)}
req.Header.Add("accept","application/json")
req.Header.Add("Authorization","Bearer "+authorization)
res, err := httpClient.Do(req)if err !=nil{
fmt.Println(err)}defer res.Body.Close()
body, err := ioutil.ReadAll(res.Body)if err !=nil{
fmt.Println(err)}var result map[string]interface{}
json.Unmarshal([]byte(body),&result)return result
}
Much like out POST request, our GET request takes in arguments. We only need the endpoint and the authorization arguments for this function. This function is pretty straight forward. However, if you want to read the response as JSON, you need to take an extra step as I've shown above.
You will want to a string mapping by unmarshaling the JSON returned by the API. Of course, your API may not return JSON, so use this accordingly. If you do need to unmarshal the JSON, you simply need to pass the response body into the json.Unmarshal() as shown above.
These two functions should help you build your other REST-related functions. Now, let's take a look at helper functions that will make your client easy to use while sending the correct data to your API.
A good SDK or client API wrapper will include helper functions so the developer using it doesn't have to still manually build requests to your API. The best way to build helper functions is to start with your data model. Let's say, for example, your API expects a JSON payload like this:
{"BookTitle":"The Great Gatsby","Author":"F. Scott Fitzgerald","Rating":7}
In this case, we'd probably want to create a struct type variable that we can use to build our payload for the reqest. That might look like this:
type BookRating struct{
BookTitle string
Author string
Rating uint}
A quick note on Go variables and functions. If the variable or the function name is capitalized, it is exported and available throughout your program.
Now that we have a struct we can use, we can start to build a helper function that would build a payload for our API. In keeping with the example in the JSON and the struct above, let's pretend our API take a POST request to rate a specific book. For some reason, our API needs the string title and string author of the book, and it needs an interger for the rating. You might create a helper function like this:
In the RateBook function, we are allowing the developer to simply pass in the title, author, and the rating. We then build the JSON payload for the developer and send it to the Post function we created earlier. When we are building the JSON payload, we must use json.Marshal to convert our struct to a type that can be used with our REST API.
You'll note, the authorization argument in the above example is "API KEY", but a good SDK will have stored that API Key when the client was initialized. I'll leave it up to you on how you'd like to handle this, but it could be as simple as calling Configure function with the developer's API Key and storing the key in memory.
This is a simple example of how you might build a Go client for a REST API. The concepts are general, but they hopefully help you if you find yourself needing to build your own client. Exceptionless will be launching its own Go client soon. If you haven't tried Exceptionless for your application's event monitoring, give it a shot now.
Electron is a great framework that makes developing cross-platform desktop applications easy. If you're a JavaScript developer, it is probably the first thing you'll reach for when you decide to build a desktop application. I know I did. In building my first and second desktop applications, I used Electron. In that process, I learned some tricks to help the development process go a little smoother. One such trick is how to better debug issues that may arise in the packaged, production version of your Electron app that you won't see in development.
If you're not familiar with Electron, it is a framework that allows you to write apps with web technologies and use them on the desktop. This is accomplished by packaging your app within its own dedicated Chromium-based application. Think of a web browser. All it is is a desktop application that allows you to explore web apps and web pages. That's what Electron does for your app. It creates a one off desktop browser. In doing so, you get access to native desktop functionalities that are not available to traditional web applications.
Like with many software projects, you might find that your local development experience doesn't exactly match what happens in production. When an app is minified, built, compiled, and packaged for production use, there can be subtle changes that can break the experience of the application or break the app entirely. This is especially true when dealing with desktop applications that have more access than you might be used to with web apps. Debugging problems when your application works locally but doesn't work in its production state can be frustrating. This becomes even more frustrating in Electron when you only have access to the web application's JavaScript output in production and not the underling Electron code's output. Fortunately, we can solve this by using an error monitoring service.
We're going to be making use of Exceptionless and the Exceptionless JavaScript client to debug and monitor our Electron application. Exceptionless is free to get started and totally open-source. Let's get started.
From within your Electron app's project directory run npm i exceptionless.
Now, we can configure the Exceptionless client and use it anywhere. This means we can use it in both the "front end" (web app) code and the "back end" Electron code. For the sake of this tutorial, we are only going to be focusing on the Electron code. Inside your main.js file, add the following below your other import/require statements:
You can get your project API key in the Exceptionless project settings page.
Now, with the client configured, you can start using Exceptionless to log events. The cool thing is these don't need to just be errors. If you want to log when a particular function is called within your main Electron code, you can use client.submitLog("Function called") but with something more descriptive. By submitting log events for particular functions, you will know for sure the function is being called. Of course, you can and should also track errors. This is as simple as calling client.submitException(error) with your error.
This is all very abstract, though. So, let's look at a practical example. Let's say your Electron app is listening to some event in order to write some data to the computer's hard disk. We need a trigger to come from our "frontend" html/js code, and then we need to read that trigger and take some action. In Electron, we use ipcMain to listen for events from the frontend code. An example of this might look like:
ipcMain.on("Save File",async(event, message)=>{try{await fs.writeFileSync("/path/to/where/you/want/to/store/the/file", message)
client.submitLog(`Wrote file successfully with the following content: ${message}`)}catch(e){
client.submitException(e)}});
I added a log event that is sent to Exceptionless in the try and I catch the error and send that to Exceptionless in the catch. The beauty of this is we know when the event is successful, which is comforting, but we also know when it fails and why. This is important, because a failure here would be a silent failure in your app.
Let's say the file path you think you're trying to write to does not exist after your Electron app is built and packaged (a common issue is that PATH variables exposed by default to applications can be different than what you use and have available in your development environment). If that path did not exist, the writeFileSync command would not work. You would have no idea why, and your users would only know it when they tried to fetch the file that should have been written.
Imagine trying to debug that without error and event monitoring. You'd fire it up locally on your machine, run some tests, try to replicate the steps exactly as the user did them. And everything would work. You wouldn't see the error because your development environment is just different enough from the production environment to keep you from realizing that the write path in production doesn't exist.
There are a million other ways your Electron app can fail silently. By adding error and event monitoring, you can quickly debug problems that would otherwise have you banging your head off your desk.
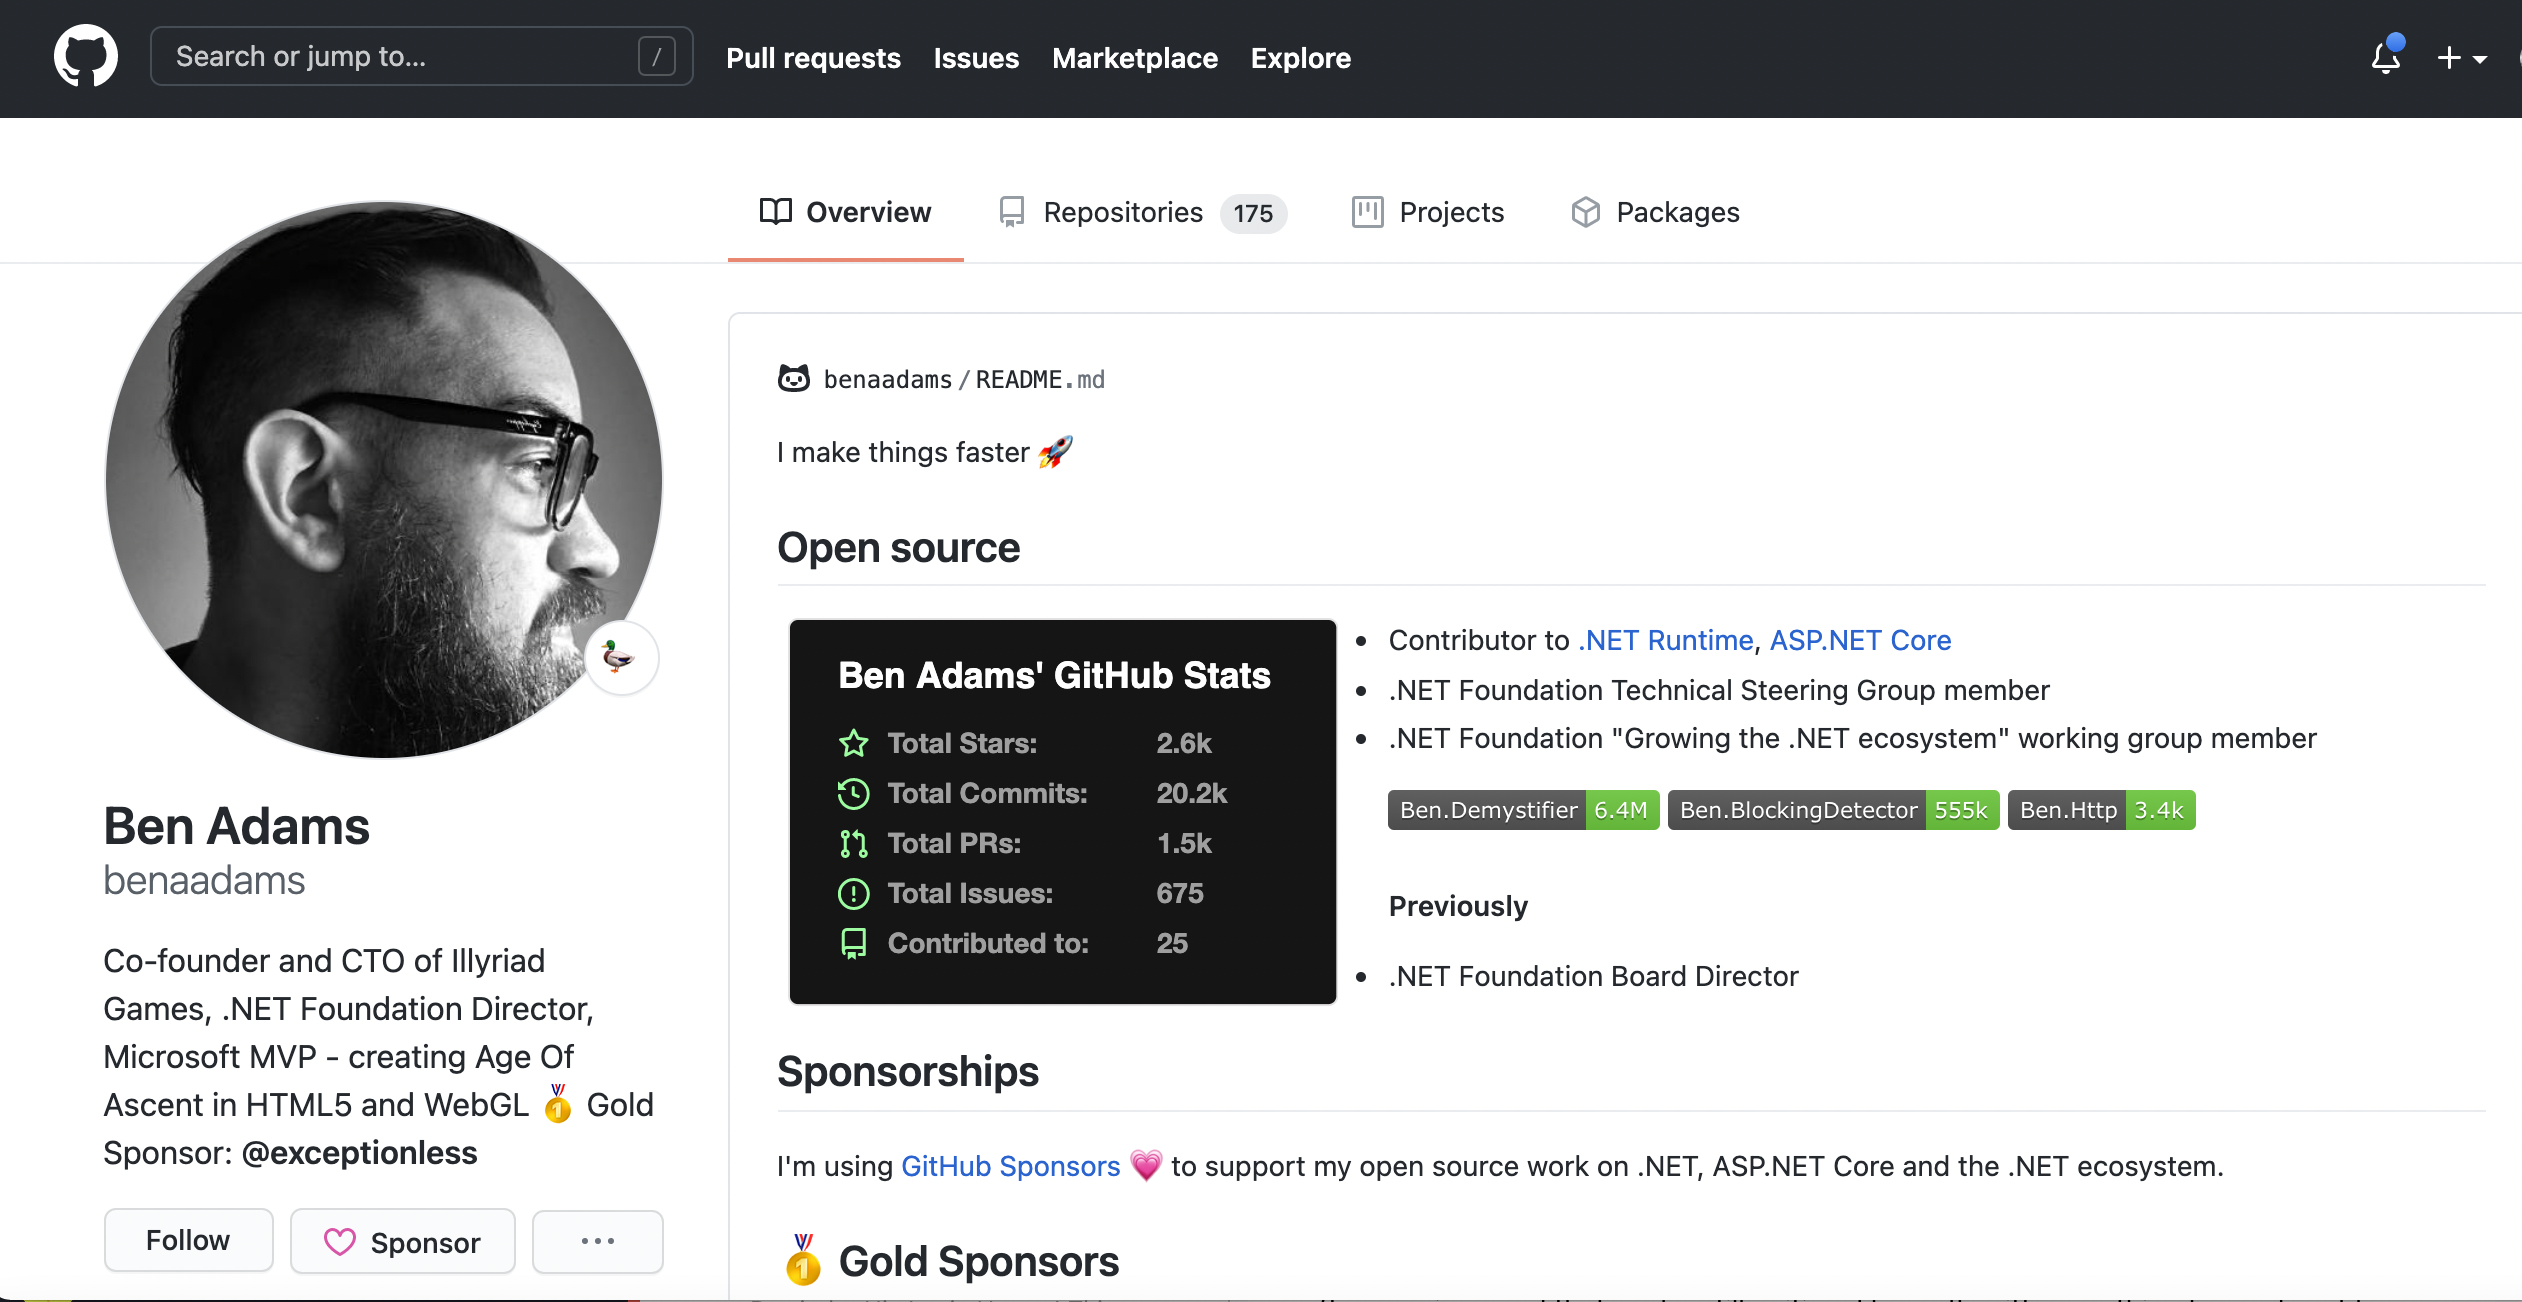
Exceptionless has always been committed to the open-source software ecosystem. In fact, Exceptionless is entirely open-source, and we try our best to make it easy for anyone to host their own instance of our software. Our main repository has nearly 2,000 stars on Github and has seen contributions from 26 different people. Across all our repositories, we've seen hundreds of issues opened, dozens of pull requests, and countless comments. And for all of that, we are so appreciative. But we wanted to show our appreciation by doing more than just saying thanks.
Today, we're excited to announce that we have sponsored Ben Adams through the Github Sponsors program. As you all know, we are huge fans of .NET, and Exceptionless is one of the only monitoring tools built around the .NET ecosystem first. Ben, like us, cares deeply about open-source software and the .NET community. We hope that by sponsoring him, we will be giving back in a tangible way, not just to Ben but to the sustainability of open-source.
Before diving into more about who Ben is and why we're sponsoring him specifically, it might be good to reflect on the importance of sustainable open-source development. Exceptionless survives through a hosted service, but many open-source projects don't have that option. This leaves maintainers in the unenviable position of having to write software, fix bugs, and respond to issues while receiving nothing more than "thanks" as payment.
"Thanks" doesn't pay the bills. Exposure doesn't pay the bills.
We don't want to see open-source developers shut down their projects. We want developers to have optionality. A quote from Kitze, the founder of Sizzy and other products, really illustrates this sentiment well:
Open source, writing blog posts, and playing with tweaking lint settings and editor themes all day are completely fine until your landlord knocks on your door or you’re at the checkout at the grocery store.
It's not just the viability of creating open-source software that becomes a problem, it's also the long-term sustainability when larger companies use that software. When we see companies like Amazon abuse open-source contributions, we see a door closing on the viability of software that is designed to survive through community and contribution.
So, while Exceptionless might not change the world by itself with its sponsorship, we want to lead by example. As Kitze said, Github stars don't pay the bills, but money does. So, we're opening our wallet and helping Ben Adams do what he's done so well for years.
Ben has been working on open-source projects for years. He has thousands of contributions across dozens of repositories. In fact, he is so prolific in his .NET contributions that everyone else with more contributions than him are Microsoft employees. It doesn't get more impressive than that. Here's a quick summary of Ben's open-source contributions:
His projects have 2,600 Github stars (which, again, don't pay the bills 😉)
He has over 20,000 commits
He has contributed to 25 different projects
He's opened over 1,500 pull requests
It should be clear by now that Ben knows his stuff. As mentioned before, Ben cares a whole lot about .NET, and so do we. So, this sponsorship makes perfect sense for us.
For the gamers and the game developers, Ben has you covered too. He is the CTO of Illyriad Games which makes Age of Ascent. Age of Ascent is a real-time MMO that puts players in the cockpits of fighter ships in space. As you might expect, the game's tech stack makes heavy use of .NET and other Microsoft-related services.
Other people recognize Ben's contributions too:
Since the beginning of the .NET Core journey we’ve had some amazing contributors but I seriously enjoy working with
@ben_a_adams!
-David Fowler
There's smart, then there's crazy. Then there's Crazy Smart. That's Ben (and he's a lovely chap, too)!
-Rich Turner
Github Sponsors allows each developer to define what comes along with sponsorship at various levels. Ben was gracious enough to offer his own development time to Gold Level sponsors, and we simply could not pass that up. While we would be happy to simply sponsor Ben's work, having him contribute code to our open-source repositories will help Exceptionless take a major step forward.
Sponsoring open-source developers is not a new concept, but having it built into Github has help elivate the visibility of portential sponsorship opportunities. We hope that by having companies like Exceptionless sponsor (and publicize those sponsorships) developers, it will encourage others to do the same. Open-source sustainability still has a long way to go, but any step forward we can help the ecosystem take, we're willing to do it.
Thanks so much, Ben! We look forward to working with you and following your continued contributions across the open-source community.
The introduction of Hooks in React was a game-changer. Developers now had options when it came to creating stateful components. It used to be that if you had a stateful component, you'd have to use a class component, and if you had a presentational component, you could choose between a class or a function component. Now, with hook, state can be managed inside function components. But that's not all Hooks did for React developers.
Hooks introduced a better way to reuse stateful functions. Today, we're going to explore how to build a custom React hook that will allow us to monitor events in our application. Those events can be errors, messages, feature usage, logs, or anything you want. There are plenty of error monitoring services out there, but we're going to make use of Exceptionless for three reasons:
Real-time updates
It's open-source
The Exceptionless JavaScript client gives us a singleton option (which makes for a good example in this post)
Let's get started by starting a new React project. You'll need to have the following available on your machine:
Node >= 8.10
npm >= 5.6
Text editor
Assuming you have that ready, open up a terminal. To create a new React project, simply run:
npx create-react-app Monitoring-App
Replace Monitoring-App with whatever you'd like to call your project. When everything is done, change into your new application's directory (cd Monitoring-App). Now, we need to install the Exceptionless JavaScript client.
To do so, simple run:
npm install exceptionless
When that's done installing, start your app (npm start) and open your project directory in the text editor of your choice.
React's docs have the simplest definition of Hooks and I think it's worth calling that out here:
Hooks are a new addition in React 16.8. They let you use state and other React features without writing a class.
The popularity of classes in JavaScript in general has oscillated greatly. However, within the React ecosystem, it was the ONLY option for creating components that could actually do anything. Because many JavaScript developers do not like and do not want to use classes, the option to write function components was a huge step forward. But outside of developer preferences, React Hooks open up new ways to write code in React apps, and hopefully help you reduce your code footprint in the process.
Hooks introduced a new way to handle lifecycle events in React as well. Gone are the componentDidMount and componentDidUpdate methods. In is the simple and elegant useEffect function.
You can read a lot more about the logic behind React's introduction of hooks here, but for the sake of this tutorial, I think that's enough of an intro.
A hook is just a function that returns a value. The big gotcha with Hooks, though, is that they can only be called within the body of a function component. Keep that in mind as we progress. It's still relatively early in the life of Hooks, but there are some standards and conventions in place. Convention is to house your custom hooks in a folder called something like hooks. Let's do that.
Create a folder within the src directory of your project called hooks. Inside that folder, we're going to create a file using another convention within the React Hooks community. Developers will generally name their hooks with a useFunctionPurpose type of pattern. For example, if you were building a Hook that determined whether a navigation bar should show up or not, you might name the Hook file useNavigation. For us, we're going to call our file useMonitoring.
Create that file inside the hooks directory, and then we can begin building the function. We'e going to go line by line and then I'll show the whole file in one snippet. Let's start by importing the necessary functions from React.
import { useState, useEffect } from 'react';
I briefly touched on useEffect. It can be thought of in the same context as componentDidMount or componentDidUpdate. We'll make use of this to handle some logic in the setup of our Exceptionless client. useState can be thought of like this.state and this.setState in React class components.
Next, we'll get access to the Exceptionless JavaScript client like this:
import { ExceptionlessClient } from "exceptionless/dist/exceptionless";
Note: it's important to reference the /dist/exceptionless file because Exceptionless targets multiple environments and we want to make sure to import the right one.
Next we're going to handle something I mentioned earlier. Exceptionless is a class-based client. This means we have the option of instantiating that class every time we use it, or we can make use of a singleton provided to us out of the box by Exceptionless. We set up the singleton patter first and then we will use some logic to handle situations where that singleton may not need to be used. Go ahead and grab the default client from Exceptionless like this:
If you haven't done so, get yourself an API Key from Exceptionless. You can sign up for a free account here. Once you have that, we're going to provide that key to to the default Exceptionless client. I like to make use of environment variables even when using keys that are safe to expose in the browser. So mine looks like this:
That's not much to look at, but there are two things I want to call out. The function name follows the convention I mentioned before, and this function takes two props: config and useDefault. If we are making use of the default singleton instance of the Exceptionless client, useDefault would be true and config would be null. However, if we are creating a custom instance of the Exceptionless client, config would be an object and useDefault would be either null or false.
Let's handle that logic. At the top of your function add the following:
We are making use of the built-in useState hook here. We are simply defining a client state variable, defining a function that will be used to update that variable (setClient), and setting a defualt value for our variable. As you can see, we set the default value to use the default client from Exceptionless. Makes sense, right?
Next, we're going to use the built-in useEffect hook to determine what client should be returned for use in the particular part of the app that requested it.
useEffect(()=>{if(useDefault){return client;}elseif(config){
config.apiKey = process.env.REACT_APP_EXCEPTIONLESS_API_KEY;setClient(newExceptionlessClient(config));}else{throw"Please pass useDefault as true or a config object in";}});
In this case, it's best to think of our useEffect function in the same way you think of componentDidUpdate. Any update to the component that called our useMonitoring Hook will trigger another event within our useEffect function.
If you wanted this useEffect method to operate more like componentDidMount, you would structure it like this:
useEffect(()=>{},[])// <-- This array says only run this function once when the component mounts
The empty array in the above example can be filled with a list of dependencies. Say, for example, you want your useEffect method to run everytime some specific variable changes, you would just pass that variable name into the array.
Ok back to our useEffect method. You can see we are checking the useDefault prop I mentioned before. If it is truthy, we return the client state variable. We had already set that variable to use the singleton Exceptionless client, so all we have to do is return it. If useDefault is falsey, we then check for the config object. If it's there, we add the apiKey to whatever values were passed into the config object, and then we instantiate a new Exceptionless client.
If no config object is provided, we throw an error. You could take this a step further and check if the config prop is actually of type object, but, hey, that's what Typescript is for, right? We're living dangerously in this crazy, crazy dynamically typed world.
The final thing you need to do in your useMonitoring function is return the client. Just as easy as it sounds:
return client;
Here's the whole, complete file:
import{ useState, useEffect }from'react';import{ ExceptionlessClient }from"exceptionless/dist/exceptionless";const defaultClient = ExceptionlessClient.default;
defaultClient.config.apiKey = process.env.REACT_APP_EXCEPTIONLESS_API_KEY;exportconstuseMonitoring=({ config, useDefault })=>{const[client, setClient]=useState(defaultClient);useEffect(()=>{if(useDefault){return client;}elseif(config){
config.apiKey = process.env.REACT_APP_EXCEPTIONLESS_API_KEY;setClient(newExceptionlessClient(config));}else{throw"Please pass useDefault as true or a config object in";}});return client;}
How can we test this now? Well, let's make use of the useEffect function to throw an error as soon as the component mounts.
useEffect(()=>{throwException();},[]);
As you remember, the empty array at the end of the function says this should only run once when the component mounts.
Now, define the actual throwException function like this:
constthrowException=()=>{try{thrownewError("Whoops, it broke");}catch(error){
exceptionlessClient.submitException(error);}}
Ready to test this out? If you previously started your React app, it probably already has worked. If you haven't started the app, go ahead and do that now.
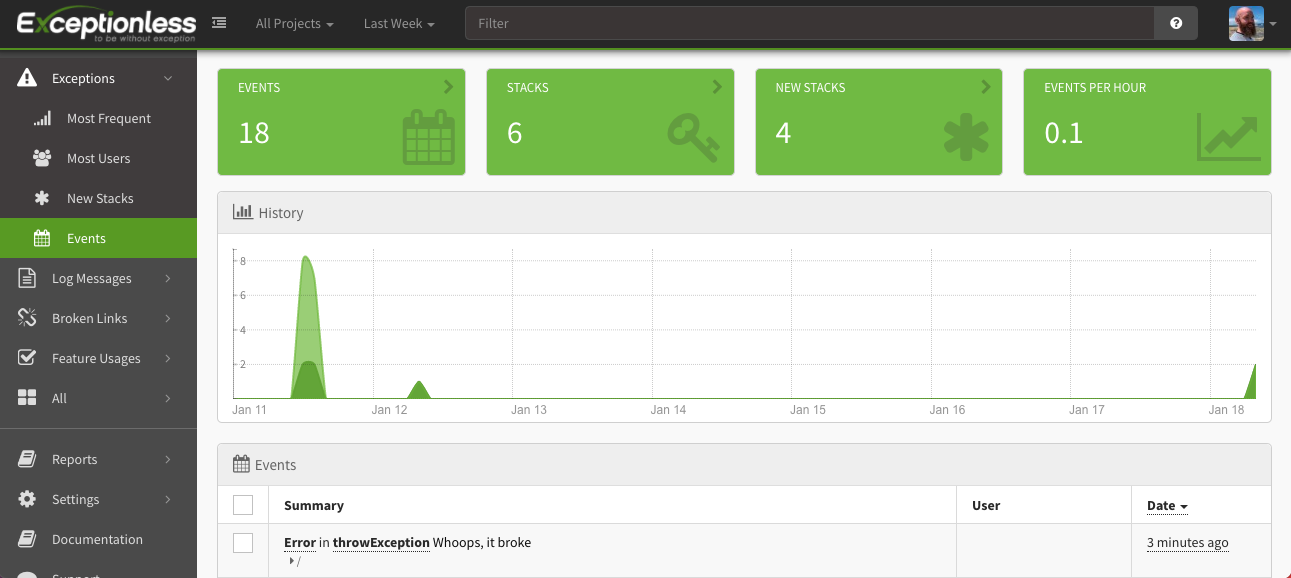
You won't see much beyond the default starter React boiletplate. But that's OK. Open up your Exceptionless dashboard, and you should see an exception has, in fact, been captured.
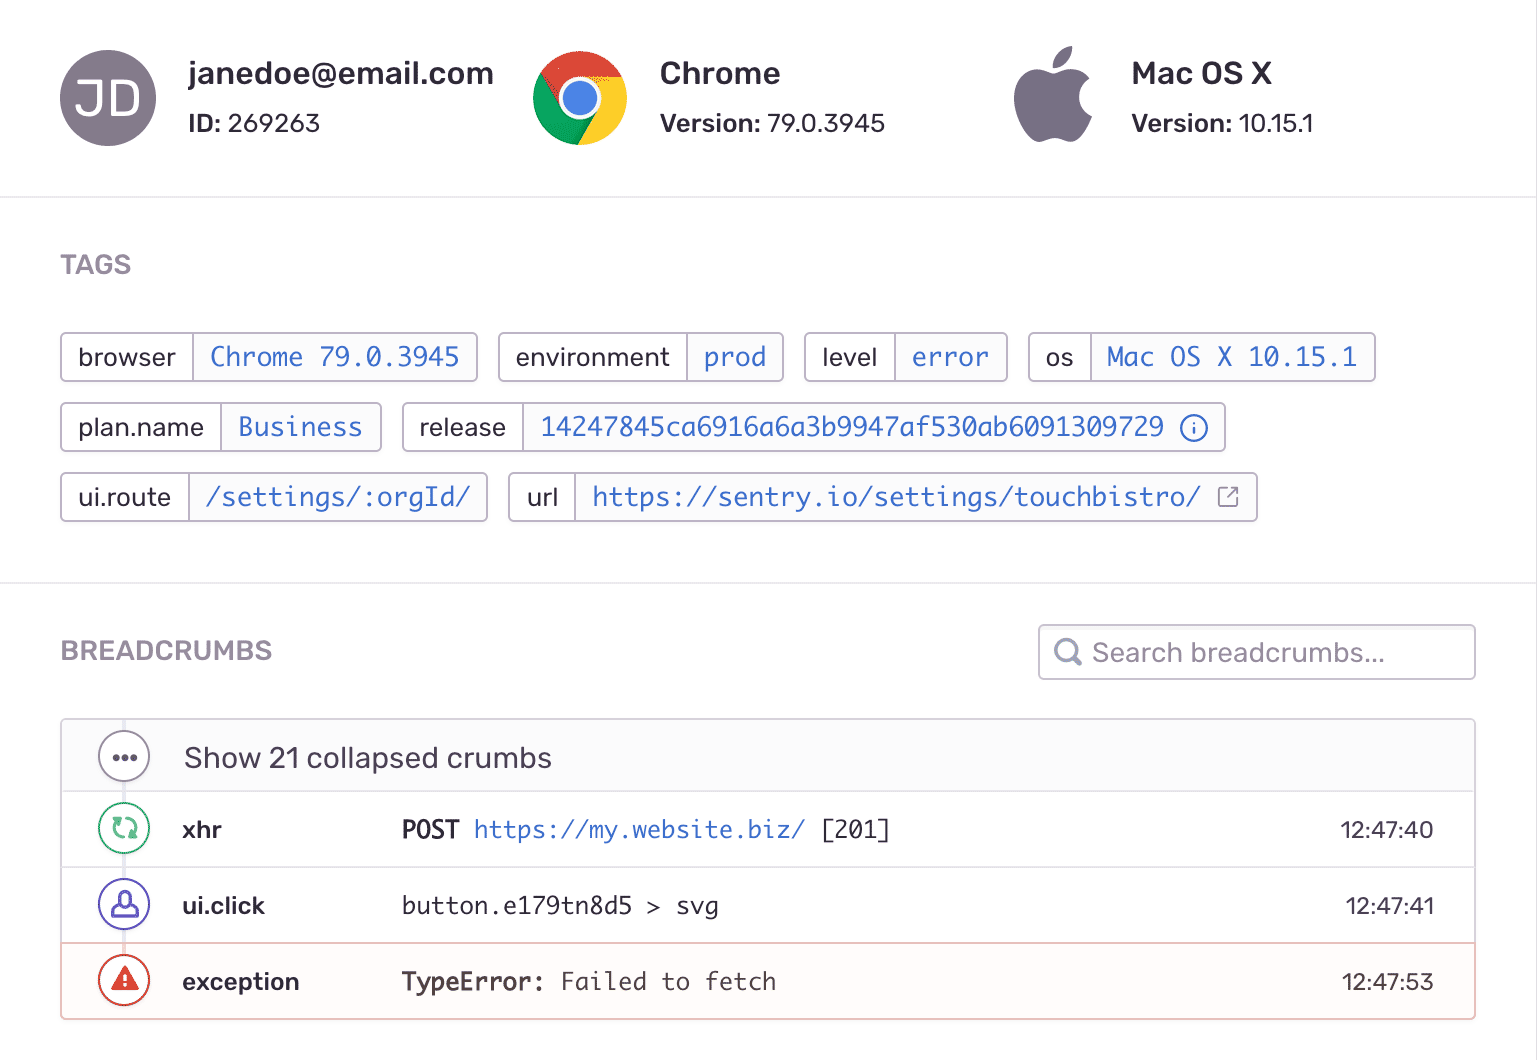
If you click into that exception, you'll get a bunch of additional, useful, information. You can start to see how this can be helpful.
Now is the time where I remind you, our custom Hook can only be used within the body of your component functions. If you were to try to use your Hook in a Redux action function, you'd see an error. The beauty is, even if you're using Redux or something else, you can still throw errors back to your component and handle the error with your useMonitoring hook.
But Exceptionless is more than just errors. Let's build a quick, more practical example.
In your App.js file, we're going to remove all the boilerplate and add some ugly buttons. No styling in this post. This is what your App.js file should look like now:
import{ useMonitoring }from"./hooks/useMonitoring";functionApp(){const exceptionlessClient =useMonitoring({useDefault:true});consthandleButtonClick=(planName)=>{
exceptionlessClient.submitFeatureUsage(planName);}return(<div><button onClick={()=>handleButtonClick("Free")}>Free Plan - Learn More</button><button onClick={()=>handleButtonClick("Starter")}>Starter Plan - Learn More</button><button onClick={()=>handleButtonClick("Premium")}>Premium Plan - Learn More</button></div>);}exportdefault App;
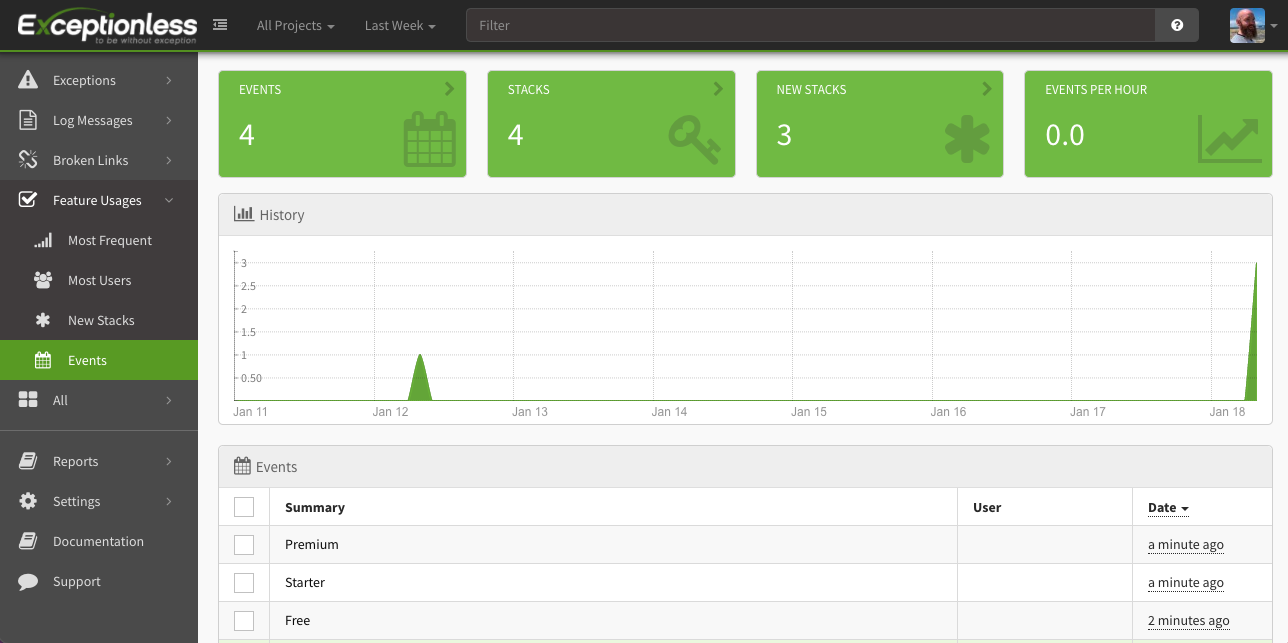
You can see we have what might be a pricing page in an app. There are three buttons, one for each plan. We have wired up a button that will call a function that ultimately sends a feature usage event to Exceptionless. Go ahead and try clicking the buttons.
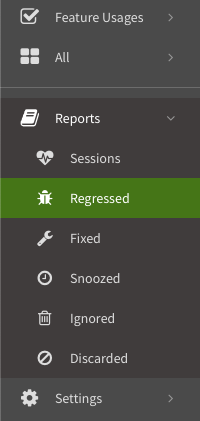
If you go to your Exceptionless dashboard and click the Feature Usage link on the left, you'll see these events have been captured in a dedicated section that makes it easy for you to track, well, feature usage. This may not replace your analytics provider, but it goes a long way.
There is a lot more you can do with Exceptionless. For example, you may have noticed, we have only passed in the useDefault prop to our custom Hook. You can completely customize your Exceptionless configuration and pass in a config prop instead. I would encourage you to read up on the options here.
Exceptionless provides a lot of methods built into its JavaScript client that will make debugging, logging, and tracking easier.
Serverless development has become the hot thing in tech. Renting time on a virtual machine only when you need it saves money and resources. However, there are many gotchas that can make working with serverless technology difficult if you're not prepared. One such gotcha is event handling.
Unlike a Web Server applications, events in a serverless function act very similarly to console applications. Take AWS Lambda, for example. A Lambda function is going to spin up, execute, and spin down as quickly as it can. You want this. This is one of the key selling points of serverless, and how developers can ultimately save money. However, this can lead to problems when trying to process asynchronous events. We'll cover how to solve that in this post.
Today, we're going to build a simple .NET Hello World serverless application and we're going to implement event handling to log errors and other events. We're going to use the dotnet cli to install a new Lambda template, but first we need to make sure we have the Amazon Lambda Templates Package.
Once that's installed, create a new directory. I'm calling mine MyFunction, but you can call yours whatever you'd like. Change into that directory and run the following command:
dotnet new lambda.EmptyFunction --name MyFunction
This will create your new serverless function project in .NET. If you open up your project in Visual Studio or whatever IDE or code editor you prefer, you'll see your main file is Function.cs. You'll also have a very helpful README, and a json file with some default configuration. We're not going to be editing anything besides the Function.cs file, but it's good to know what's provided out of the box when generating a new lambda project.
We now need to add Exceptionless to the project. Exceptionless is an open-source event monitoring service available to all programming languages, but dedicated to .NET. Let's install it by running this command at the command line:
dotnet add package Exceptionless
This will install the most recent version of Exceptionless and is the foundation to you adding event handling in your serverless app. Once Exceptionless is installed, we can take a look at our code and see about where we might want to utilize Exceptionless.
Open up the Function.cs file again and add the Exceptionless namespace like this:
using Exceptionless;
Now, let's take a look at the function itself. It's a pretty simple function that returns a string in its uppercase form. We're going to change this around to instead return "Hello" plus the string passed in. Of course, that's not the focus of the tutorial, so we're going to also wire up error handling and event processing.
So, let's start with error handling. We can manually force an error that will fall into the catch block of a try/catch by not passing in a string to our function. Update your function to look like this:
usingSystem;usingSystem.Collections.Generic;usingSystem.Linq;usingSystem.Threading.Tasks;usingExceptionless;usingAmazon.Lambda.Core;[assembly:LambdaSerializer(typeof(Amazon.Lambda.Serialization.SystemTextJson.DefaultLambdaJsonSerializer))]namespaceMyFunction{publicclassFunction{publicasyncTask<string>FunctionHandler(string input,ILambdaContext context){var client =newExceptionlessClient(c =>{
c.ApiKey ="YOUR EXCEPTIONLESS API KEY";});awaitusingvar _ =newProcessQueueScope(client);try{if(input ==null){thrownewException("input value is required");}return"Hello, "+ input +"!";}catch(Exception ex){
client.SubmitException(ex);return ex.Message;}}}internalclassProcessQueueScope:IAsyncDisposable{privatereadonlyExceptionlessClient _exceptionlessClient;publicProcessQueueScope(ExceptionlessClient exceptionlessClient){
_exceptionlessClient = exceptionlessClient;}publicasyncValueTaskDisposeAsync(){await _exceptionlessClient.ProcessQueueAsync();}}}
We've added the Exceptionless namespace, we've converted the function to take in a string and return a hello world string.
To test error handling, we have set up a try/catch that will throw if no string is passed into our function. If that happens, we send the exception to Exceptionless.
Because we need to make sure events are sent to Exceptionless before the function ends, we are using the ProcessQueueScope instance. This helper class processes the internal queue when the FunctionHandler is disposed.
Now, it's time to test. Fortunately, there's a super easy way to test our code before we deploy to AWS. In your root directory, find the test folder. Nested in that folder is a test file called MyFunction.Test.cs. We're going to edit this file a bit and run our tests from the command line.
This test should pass and we should not be sending anything to Exceptionless. To test it, switch into MyFunction/test/MyFunction.Tests and run dotnet test.
If your test passed, you're in great shape! But we don't just want to test our function. We want to make sure errors are sent to Exceptionless. So let's force an error.
The test should pass because we don't get a response of "Hello, John!". But what we want to do is check to see if the exception was sent to Exceptionless.
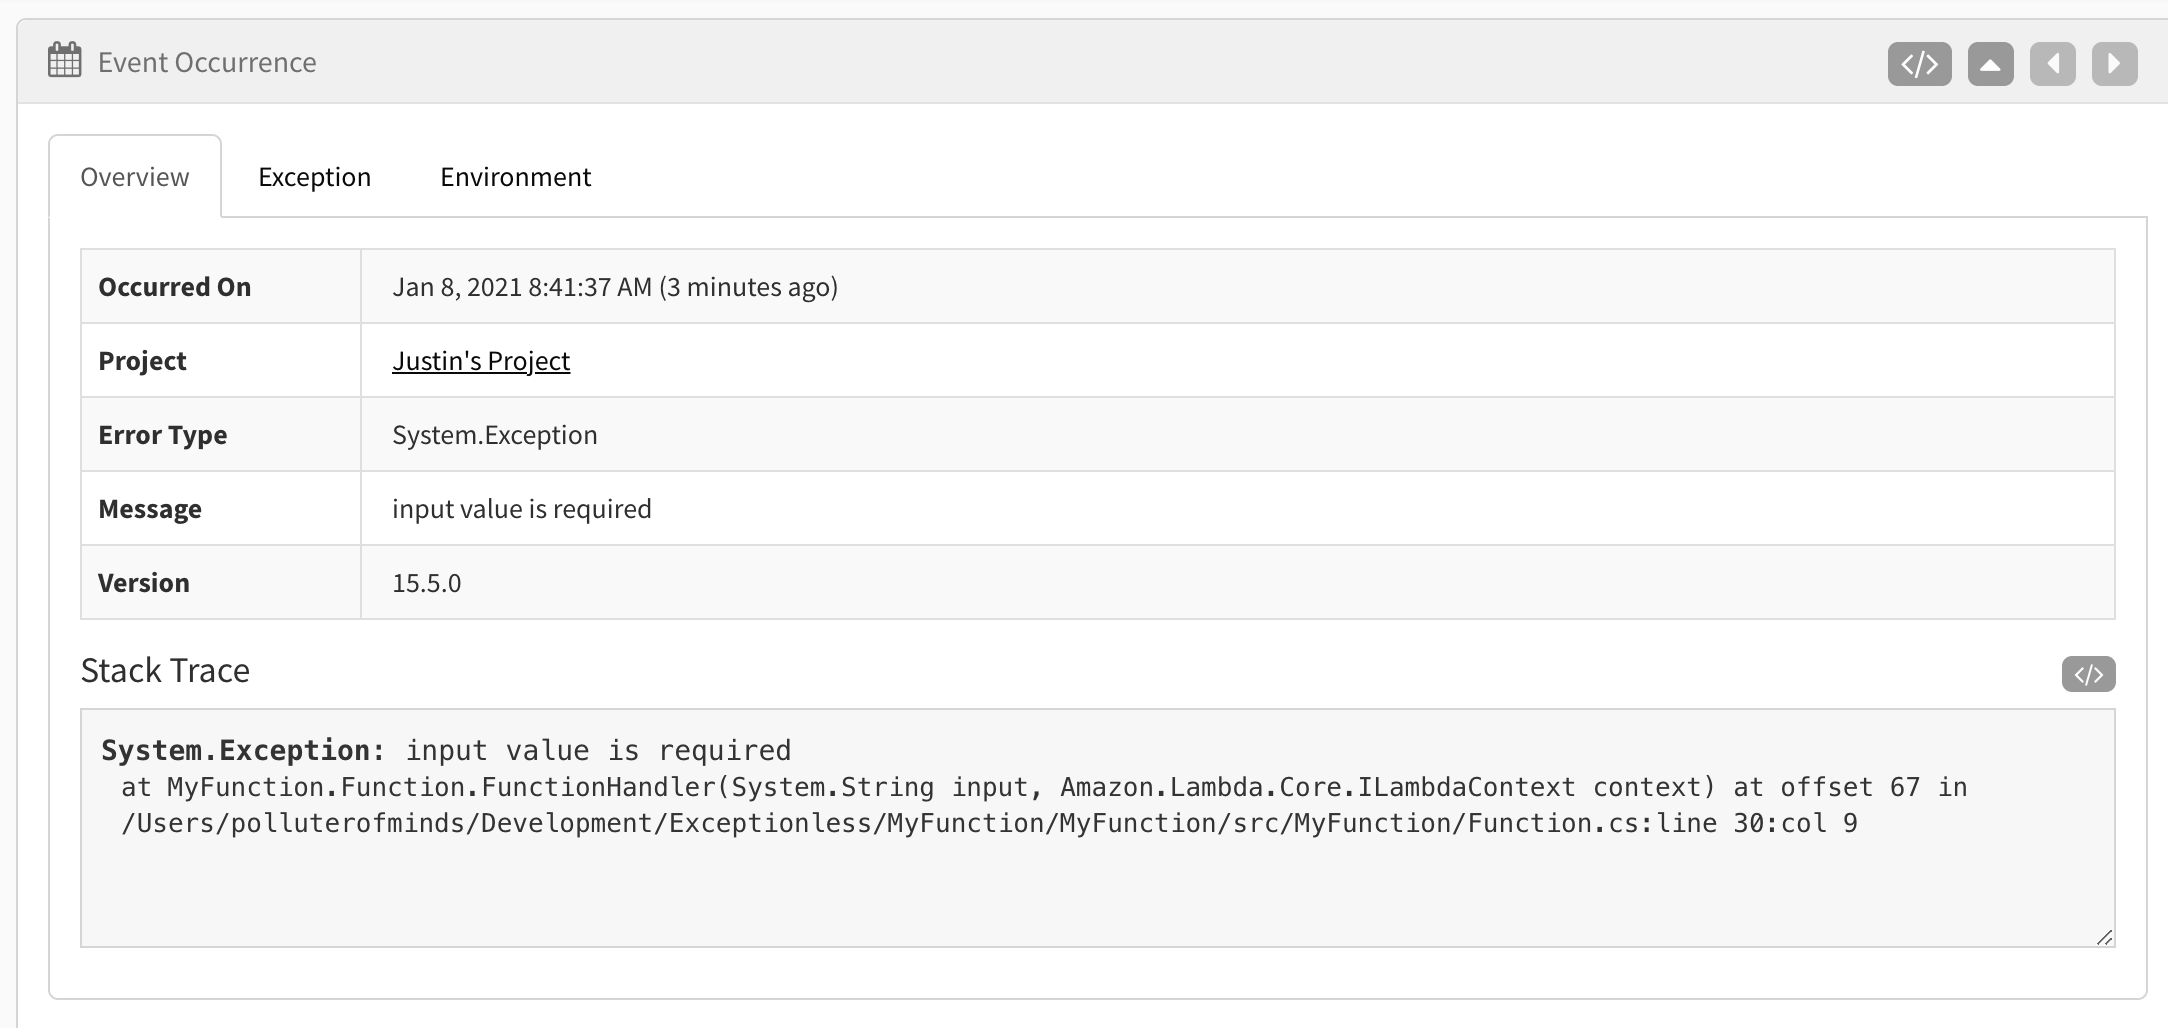
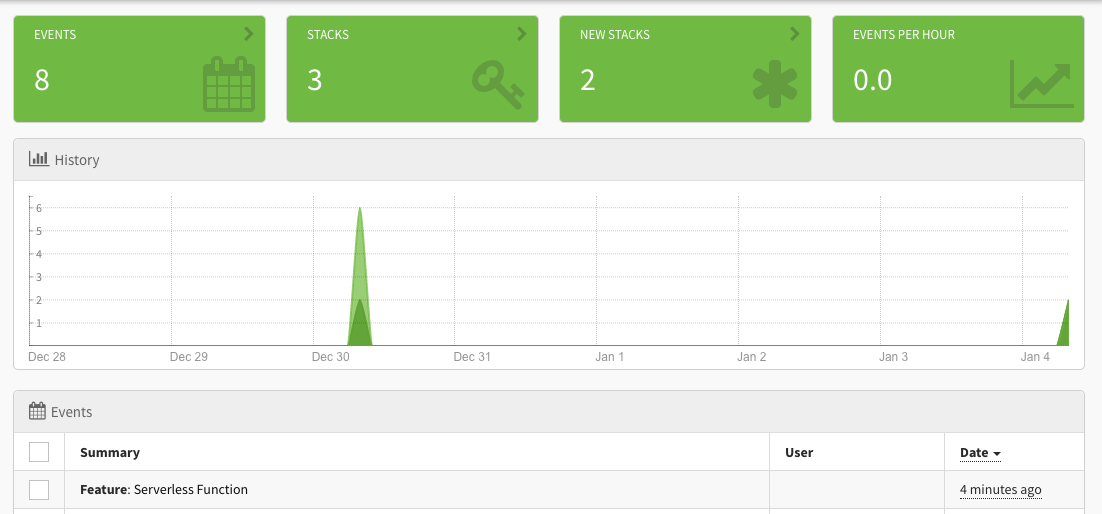
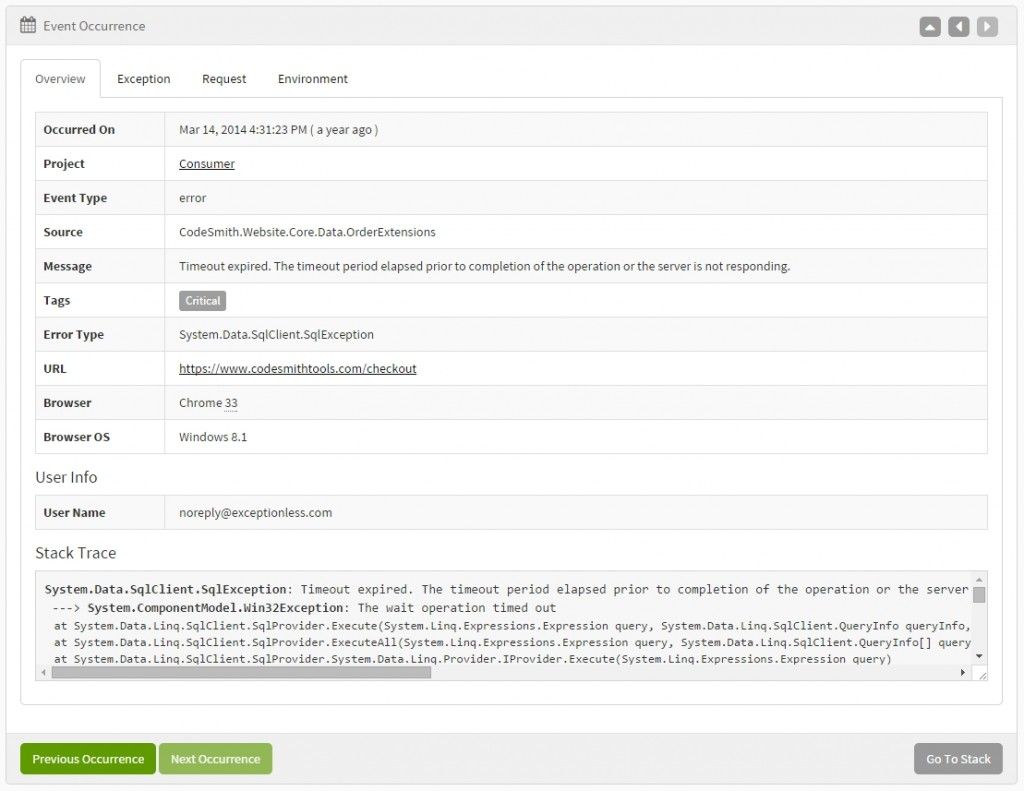
Open up your Exceptionless dashboard and you should see something like Exception in FunctionHandler input value is required. If you click on it, you'll see more details like this:
There are three tabs on the details page. In the above screenshot, I have selected the "Overview" tab. However, if you explore the other tabs, you'll see value data captured for you automatically.
Cool, so we created an exception. What about something a little more complex?
Let's say we want to track the usage of our new serverless function. We can do that pretty easily with Exceptionless. Let's change the current try/catch block to look like this:
try{if(input ==null){thrownewException("input value is required");}
client.SubmitFeatureUsage("Serverless Function");return"Hello, "+ input +"!";}catch(Exception ex){
client.SubmitException(ex);return ex.Message;}
Here we are sending a feature usage event to Exceptionless as soon as the serverless function is triggered and we're sure the input is not null. The nice thing about this is that it doesn't rely on any errors being thrown and the rest of your function can continue to execute.
Let's run our tests again. We should get the feature usage event as well as an additional error because, remember, one of our tests forces a null exception.
In our dashboard, if we look at all event, we will see our feature usage event logged.
These types of events (features, logs, errors) because especially useful in serverless environments. Often, default logging in a serverless environment is either non-existent or much more difficult to set up. By dropping Exceptionless into your serverless application, you can track just about anything you're interested in. If you'd like to see full examples of Exceptionless in Lambda functions, check out our examples here and here.
You've heard of test-driven development. You've heard of behavior-driven development. Maybe you've even heard of acceptance-driven development. But you probably haven't heard much about exception-driven development. Let's take a look at what that type of development process is and why you should be practicing it.
Jeff Atwood, of Coding Horror, wrote a blog post almost 12 years ago about this topic. In those dozen years since his post, the need for exception-driven development has only increased, but developers and companies need a clear understanding of how and why to practice this type of development.
At a high-level, exception-driven development is simply the practice of monitoring for exceptions in your code and shipping fixes quickly. To ensure you are monitoring the right things and shipping the right fixes, all without burdening your users, you have to make sure you are collecting the right data.
Contextual data is the key to exception-driven development. Arbitrary data from various points of input may not be useful. Data that is highly contextual to user actions, user experiences, and points in time during the use of your app will allow you to target better solutions and ship faster.
With your contextual data in hand, you can start to fix issues. But here's the rub: You can't wait until you "have enough" fixed for a deployment. Part of the exception-driven development process is deploying often. Have a single bug that took one line to fix? Cool, ship it. Know that you'll have additional features to put out in a few days and you're considering holding your bug fix for that deployment? Don't. Ship the bug fix, then ship the features.
Exception-driven development isn't a mysterious new process for most developers, but it is a mindset shift within many organizations. Bug fixes, listening to the data, and responsiveness must take priority if you are to transition to an exception-driven development cycle. While it may not take much effort to change your company's internal process, it may still take some convincing. So, why should you and your company practice exception-driven development?
The first reason you should care is the most obvious reason. Your code has bugs. It does. No matter how good you are, you're going to ship bugs and you need to be ready to fix those bugs. Jeff Atwood probably said it best in his post about exception-driven development:
The question isn't how many bugs you will ship but how fast you can fix them.
Bugs are a part of code. Some never get fixed. But the ones that need to be fixed need to be fixed quickly. The trouble, of course, is that if you are relying on your users to tell you about these bugs, you've already taken too long to fix the issue.
Wait, what?
It's true. If your users have told you about bugs through email or Slack or Discord, you have already taken too long to resolve the issue. This is where the heart of exception-driven development comes in. You need to know about issues the second they arise.
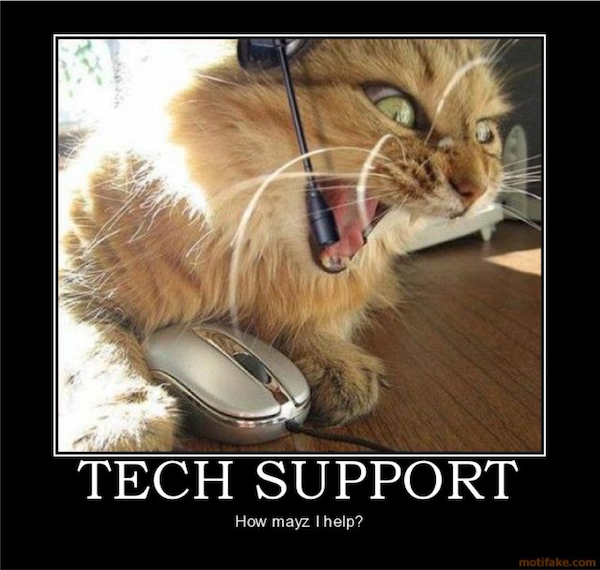
You don't want to turn into this guy, right?
Think about it this way. How many lines of code does your application have? Got that number in mind? Ok, now divide it by 1000. Take your resulting number and multiply it by 15. That is possibly how many bugs you have in your software right now. Knowing this, don't you think it's important to try to find these bugs before your users have to tell you about them?
By practicing exception-driven development, you make your customers happier which protects your brand image. Do you want to be the brand that has a ton of bugs or do you want to be the brand that solves problems? You also make your developers happier. Would you rather fix a bug on a piece of code shortly after you were working on it, or do you want to try to fix it six months later after you've long forgotten about that code?
Customer retention, customer conversion, productivity, morale, and more are the reasons exception-driven development is important. Convinced yet? Good, now how do you do it?
If you remember, the first step of exception-driven development is to collect contextual data. Contextual data means data more than the stack trace itself. You should be collecting those traces, but the stack trace is just part of the picture. Some of the questions your contextual data should be answering include:
What user had this problem?
Where in the application did the problem occur?
Has the problem occurred previously?
What actions did the user take leading up to the issue?
You can probably think of other questions you'd like answered to help you with the bugs that come in. But notice that the suggestion here is not to collect this information directly from your users. Don't wait for an email from them. Don't follow-up with questions about their operating system and browser. Collect that information upfront without the user having to take action, and you will have your contextual data. Services like Exceptionless make this easy.
But why use a service like Exceptionless? You're a developer, you can just build the solution yourself. Sure you can, but then you have to manage that solution. You have to fix bugs on that solution while also fixing bugs you've found from your actual production application. You're not in the business of running an error monitoring service. But Exceptionless is.
Once you've collected your contextual data, you should know what to fix, where to fix it, and why it needs to be fixed. So, the logical thing to do is—well—fix it. The trick, though, is not to allow code creep to slow your release down. It's easy (trust me we all do it) to say, "oh, I'll just add this little feature or change this one other thing" when you're trying to fix a bug. You have to fight that urge, fix the bug, commit the code, and ship it. Then, you can go back and work on the shiny thing that almost distracted you.
Once your code is shipped, if you are using Exceptionless, you can mark the version that fixed the bug right within your dashboard. By doing this, you'll automatically know if you have any regressions. Exceptionless will track new occurrences of the error and compare the occurrence against the version of software the user is using and the version you marked as solving the problem. If those versions match, it's a regression.
The whole flow of collecting data, analyzing the data, writing code, and shipping should not be foreign to you. Yet, exception-driven development is still not practiced everywhere. Hopefully, this article helps you understand why you should change your ways and how to do it.
Error monitoring is vital to the success of any application. Console logs only get you so far. Once your app is out in the wild, asking your customers to open up the developer tools window and inspect it for errors is a deal-breaker. This is where error monitoring services come in. Let's take a look at three different services:
Each service, generally speaking, handles errors and logging for your applications, but not all services are created equally. Let's take a closer look at each and see how they stack up.
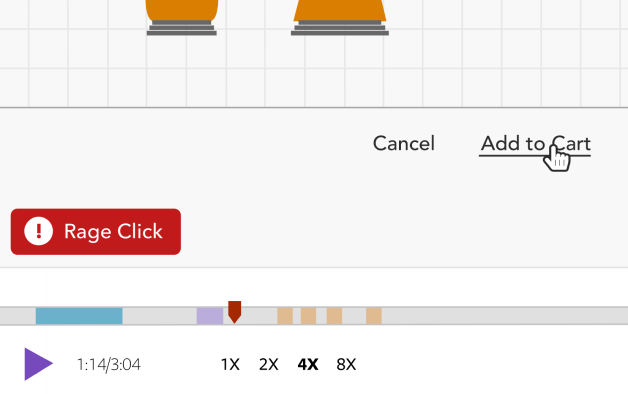
Log Rocket was founded in 2015 and is an error monitoring service that focuses on replaying the events that led up to the error. While some services focus on digging into the error details themselves, Log Rocket uses HTML from the user's session to reconstruct a playback of what the user experienced.
What LogRocket does is we capture a recording in real time of all the user activity so the developer on the other end can replay exactly what went wrong and troubleshoot issues faster.
Log Rocket is a venture-backed company that has raised $30 million in its history. It provides its tools exclusively as a for-profit, hosted solution. They do offer self-hosted options, but only as part of their enterprise, custom pricing.
Their focus is on user experience through the tracking of everything a user does on the site. While this is helpful, it is also a bit invasive in the fact that the default installation of Log Rocket captures just about everything a user does in the application.
Sentry was founded in 2012 and is focused on capturing errors at the code-level and sending them to a repository for review and organization. Sentry allows you to configure the groupings of errors and presents them in an interface designed to surface the most-pressing errors first.
In addition to surfacing errors, Sentry allows users to create custom alerts. For example, should a specific event occur, you can set up a trigger to send an email to your team. This is generally used for errors, but it could be used for just about any event sent through to Sentry.
Sentry, like Log Rocket, is also a venture-backed company. They have raised over $66 million in their history. Unlike Log Rocket, Sentry provides an open-source and self-hosted solution for free. For users that do not want to pay for Sentry's hosted option, they can utilize Docker to run a self-hosted, containerized version of the Sentry platform.
One big differentiator for Sentry is its focus on providing services for a wide array of platforms.
Sentry differentiates from legacy application performance monitoring solutions by focusing on software that runs on devices its developers have no control over, including mobile and IoT devices and smart sensor networks.
Exceptionless has been around the longest of the three services reviewed here. Created as a software offering from the parent company CodeSmith Tools, Exceptionless was established in 2010 and is privately held. It is positioned as a tool to help first and a product second. This is why one of Exceptionless's main focuses is the open-source community.
Exceptionless lets developers capture logs, events, and errors. However, Exceptionless's real differentiator is its real-time delivery mechanisms. Rather than costly code deployments to change your error monitoring configurations, Exceptionless allows you to make changes from their user interface and those changes will apply instantly in your application. This is key when it becomes clear that additional errors need to be surfaced quickly.
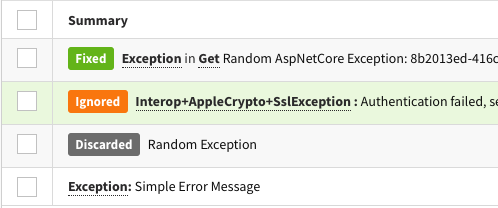
From the user experience and customer experience front, Exceptionless works hard to stand out from the competition. In Exceptionless 7.0, customers are now able to mark stacks of errors and logs as "discarded", the events will no longer count against plan quotas. Combine that with their chat, email, and Discord support, and Exceptionless proves its focus on customers.
Digging into the product features, Exceptionless provides one of the cleanest views for understanding events and errors in your application.
All the information you need about errors and events are captured in a simple, easy to read view. From your dashboard, you can consolidate events into stacks to help group relevant issues. You can also indicate the resolution of events based not just on the fact that the issue was resolve but based on the version of your software that fixed the event. Exceptionless will automatically recognize any new errors that come in with an older version and group them in the resolved bucket. However, should the error surface on the version of your software in which you marked the issue fixed, Exceptionless will classify this event as a regression without you having to manually do so.
The answer to this often comes down to what's most important for your application. Each service has its merits, but the value provided differs based on use-cases. Log Rocket offers full session replays, but may not be the right solution for digging deep into stack traces. Sentry offers full stack trace reviews and error categorization, but it may not be the right solution if you need the ability to update your error handling configuration in real-time. Exceptionless provides real-time error monitoring and configuration, and it is committed to the open-source community.
Imagine this scenario. You're debugging your application. You KNOW there is a problem, but your logs aren't showing you anything helpful. You've bounced your head off your desk at least 34 times. Then it hits you!
You've configured your error monitoring service to only capture FATAL errors, but this error is surely some other level. Your log level settings need to be updated.
The good news is you've figured out what the problem is (at least what the problem is that's keeping you from debugging the real problem). The bad news is you now have to update your applications code to ensure the right log levels are being passed through to your error monitoring service. You have to save your code, re-deploy, then start re-testing.
That's a pretty terrible experience, but fortunately, it's one that Exceptionless has solved for you.
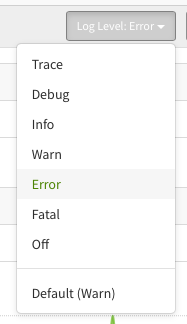
You can customize the log levels Exceptionless will track for you. ON. THE. FLY. You don't have to touch your code. Instead, should you run into the problem above, you can change your default log level and it will be applied immediately. Any new events coming through that match the level you set will now be stacked up and tracked for you.
We recognize that every application is different. Every developer is different. Being able to easily customize the data captured through Exceptionless is an important part of our mission. This is why in v7.0.5, we have updated the user interface to support default log level selections.
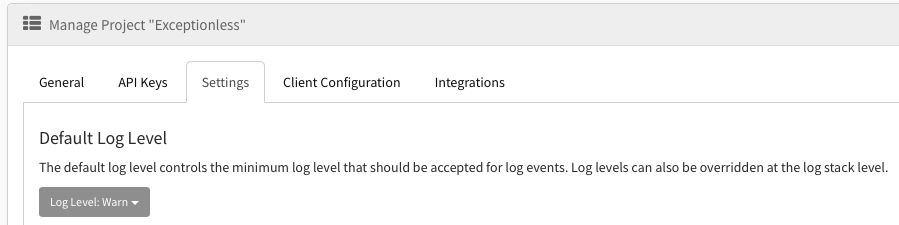
As you can see in the image above, the current example default is "Warn." You can override that default on the Stacks page any time you'd like. But if you want to customize that default log level from the start and have it apply across the board, you can do so on your settings page.
Logging is key to understanding problems in your application, but it can also act as a historical record useful for post-mortems and general analysis. However, not all logs are important or necessary. And even if they are, you may want to filter them out in certain scenarios.
Enter log levels.
Log levels control what types of messages are logged. The general definition of log levels, and what we use at Exceptionless is:
TRACE
DEBUG
INFO
WARN
ERROR
FATAL
OFF
By setting your log levels, you are essentially saying you'd like to see information grouped into the buckets defined by the log level. For example, if you'd only like to log the most severe issues, you might select a log level of FATAL.
We want to help you with this flow by automatically accepting or ignoring errors and messages that don't match the log levels you've defined in Exceptionless. We think this will help you better manage your exceptions, reporting, and overall development flow. We can't wait to hear your feedback. If there's any questions, suggestions, or general feedback, we'd love to hear from you. You can reply here or open an issue on Github.
Feedback and community support is the key to growing a successful open-source company, and you all have provided us some of the best feedback possible. With your feedback, we just released one of our biggest improvements yet. This release includes changes on both the application interface and the core functionality. We wanted to highlight some of the main improvements and why we did it.
This improvement is more than just visual. We heard the feedback from you loud and clear. There are stacks you don't want to track, but filtering them out on your end is difficult. For that reason, we are introducing the "Discarded" status. If you mark a stack with this status, it will not be tracked in your dashboards and, more importantly, it won't count against your plan limits 🎉.
As part of this improvement, we also consolidated statuses. Operations that were duplicative or didn't make sense were removed or combined.
All dashboards now have a both high level stats and a timeline view by default. This gives you better information at a glance and allows you to go deeper with your stacks and events as needed.
You'll also notice we've renamed some of our stats labels to make things a little more clear.
We've made some minor adjustments to navigation icons, spacing, and more to make the experience in Exceptionless better as you move throughout the application.
We are constantly improving based on user feedback. If you'd like to reach out, please do so any time. You can also add your feedback at either of the two links below:
The beauty of open-source solutions is that you are often given the option to self-host or pay for an easy hosted solution by the company or people who created the project. This is true of many projects. Ghost is a popular example of this from the blogging world. Some analytics serves, including Matomo, allow users to choose between a hosted and a self-hosted solution. In that same vein, Exceptionless provides a self-hosted option for those who would like to host their own error monitoring.
Today, we're going to walk through setting up a self-hosted Exceptionless instance. Let's get started!
Exceptionless provides a simple Docker image to help get started with self-hosting. We're going to make use of that, so the first step is to download Docker for desktop if you don't already have it. Once you're able to download that and start it, you should then be able to execute docker commands from the command line. Test it out by running docker stats in the command line.
Pretty cool, right? Just by downloading and running the desktop application, you also have access to the Docker CLI. That CLI is what we'll need to run our self-hosted instance of Docker.
Let's make sure we can get Exceptionless running locally. Ready for how easy this is? Are you?
Ok, start up Docker Desktop, then in your command line, run:
docker run --rm -it -p 5200:8080 exceptionless/exceptionless:latest
This will check to see if you've already downloaded the latest Exceptionless release, and if not, it will install all of the necessary dependencies. This is important because Exceptionless is split into a client-side front-end and a server-side back-end. Docker lets all of this be combined.
When the process in your command line finishes up, open your browser and navigate to http://localhost:5200. If all went well, you should see the Exceptionless login page.
Go ahead and sign up for an account. Keep in mind, this is not a good production solution, but it's a great way to get started with a self-hosted error monitoring solution.
Along with the front-end that we're looking at now, you also have a full Exceptionless server running. To prove it, let's run a simple cURL command.
Make sure to use the email and password you just signed up with. You should get a token back. This shows you that the API is running successfully and you can now do everything you would with a hosted Exceptionless instance, but locally. Go ahead and try it out. Here are the full API docs for Exceptionless.
The problem here is the data you save in this run of your self-hosted Exceptionless instance will not be saved between runs. As soon as you shut down Docker and exit the application, your data will be deleted and you'll be starting from scratch. That's no fun. Let's fix it.
Go ahead and shut down Exceptionless either by exiting in the command line or by going into your Docker Desktop Dashboard and clicking the stop button your Exceptionless instance. Once it's stopped, open up your command line again and run:
docker run --rm-it-p5200:8080 \-v$(pwd)/esdata:/usr/share/elasticsearch/data \
exceptionless/exceptionless:latest
If you're using PowerShell, you'll instead want to run:
docker run --rm-it-p5200:8080 `-v ${PWD}/esdata:/usr/share/elasticsearch/data `
exceptionless/exceptionless:latest
Now, when you sign up at http://localhost:5200, your data will be persisted. You can start tracking errors locally and that data will be shown in your Exceptionless dashboard even after you shut down Docker/Exceptionless and restart it.
Your homework: Try running this locally with SSL and SMTP enabled. It's just as simple as everything else we've done so far because Exceptionless has really taken the time to make sure the developer experience is top-notch. Check out the instructions here.
Error monitoring is incredibly important to both your customer's experience and your own sanity. To give yourself true control over error monitoring, you can choose a solution like Exceptionless, and as you've seen here, self-host it pretty easily. Of course, if you'd rather let Exceptionless take care of hosting, that's covered too.
Now, you can go and experiment with your newly installed, self-hosted, error monitoring service. Will you let it run on your machine? Will you tinker and get it production-ready? Will you deploy it to a remote server somewhere? (That last one might be the subject of a future post 😉)