Did you know there are customizable server/client configuration values within your Exceptionless Project's settings? Well now you do - and knowing is half the battle!
These project level settings are a dictionary of key value pairs (string key, string value). They are defined server-side and automatically pushed to the client when they are updated. Using this feature allows you to control what you send without redeploying your app, which we think is pretty cool!
You can use these client configuration settings for a variety of applications, including:
Controlling data exclusions for protecting sensitive information
Enabling / Disabling user signups
Turning logging on or off
Enabling analytics
Controlling information collection
And many more! You can send any key value pair to control whatever you like within your app.
Let's take a look at a JavaScript and .NET client usage example to get your rolling with this feature.
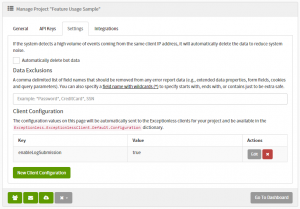
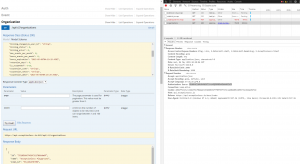
Before we get started with more of an explanation and an example, we need to add a new key and value. To do so, we go to Admin > Projects in our Exceptionless Dashboard, select the project we are working on, then go to the "Settings" tab.
This is where we can add a "New Client Configuration," which simply consists of the key and value. For the example below, we'll add the (fictional) enableLogSubmission key and set it to true.
When your application first starts up, your project's client configuration settings are read (from storage) and applied.
If a setting value doesn’t exist in storage, it will be retrieved from the server after the next event submission occurs. We do this by inspecting the response headers and comparing a response header that contains the setting version. If the version doesn’t match the saved setting value then we make a request to get the setting and apply it.
It’s worth noting that we allow you to define your own default settings and overwrite them with server side settings, which we'll include in our example.
In the example below, we will dynamically turn on or off the log event submissions at runtime without restarting the app or logging into the server to change configuration settings.
Why, you ask? Maybe we don't care about log submission until there is a really tough issue to solve. With Client Configuration Values, we can simply turn it on only when needed.
We’ll assume for this example that we are using the enableLogSubmission key we created above to control this. This setting is made up and doesn’t have to exist server side since we will be providing a default value client side. This allows us to define it via the project settings page at anytime and change our applications behavior.
To control this we will be registering a new client side plugin that runs every time an event is created. If our key (enableLogSubmission) is set to false and the event type is set to log, we will discard the event.
ExceptionlessClient.Default.Configuration.AddPlugin("Conditionally cancel log submission",100, context =>{var enableLogSubmission = context.Client.Configuration.Settings.GetBoolean("enableLogSubmission",true);// only cancel event submission if it’s a log event and enableLogSubmission is falseif(context.Event.Type == Event.KnownTypes.Log &&!enableLogSubmission){
context.Cancel =true;}});
You might notice that we are calling the GetBoolean method to check the enableLogSubmission key. This is a helper method that makes it easy to consume saved client configuration values. The first parameter defines the settings key (name). The second parameter is optional and allows you to set a default value if the key doesn’t exist in the settings or was unable to be converted to the proper type (e.g., a boolean).
.NET Helpers
Above, we used the GetBoolean helper method. In the .NET client, we have a few helpers to convert string configuration values to different system types. These methods also contain overloads that allow you to specify default values.
Helper List
GetString
GetBoolean
GetInt32
GetInt64
GetDouble
GetDateTime
GetDateTimeOffset
GetGuid
GetStringCollection (breaks a comma delimited list into an IEnumerable of strings)
The same functionality above can also be achieved using our new JavaScript Client.
exceptionless.ExceptionlessClient.default.config.addPlugin('Conditionally cancel log submission',100,function(context, next){var enableLogSubmission = context.client.config.settings['enableLogSubmission'];// only cancel event submission if it’s a log event and// enableLogSubmission is set to a value and the value is not true.if(context.event.type ==='log'&&(!!enableLogSubmission && enableLogSubmission !=='true')){
context.cancelled =true;}next();});
If you would like to be notified when client configuration settings are changed, you can subscribe to them using something like the below code. This is useful when you want to update your application in real time when settings change server side.
These Client Configuration Values are somewhat of a hidden Exceptionless gem, but we think they are power and that many of our users can find real value in using them to control the flow of information, specifically sensitive data.
If you have any questions or comments, please let us know. As usual, we're all ears!
Last week we announced the V1 release candidate for the Exceptionless JavaScript/Node.js Client. This week we've got official release notes for you! Have a look.
We built the Exceptionless JavaScript/Nodes.js Client with the past and future browsers in mind. Everything is testable via components injected on startup (via dependency injection), which means you can replace any component of the system to fit your specific needs.
Client is a full feature parity of our .NET clients, including:
Support for custom objects
Mark events as critical
Server side settings
Data exclusions
Plugins
and more...
Includes first class integration for third party libraries like AngularJS and Express
Everything you need to get up and running (including contributing/developing) can be found on the Exceptionless.JavaScript GitHub repo. JavaScript, Express, TypeScript, SystemJS, and RequireJS examples can be found in the example folder. As always, you can contact us via an in-app message for help, or submit an issue on GitHub with bugs, feedback, etc. We're here to make sure you get things working properly so you can take full advantage of Exceptionless!
If you've been following along the last few weeks, you know we've been working hard to get the new JavaScript Client up to speed and ready for a version 1 release.
We think we're there!
Whether you're a JavaScript or Node.js user, you'll be able to enjoy the same full featured exception and event reporting platform that our primary .NET client offers, with fewer platform specific boundaries.
We have been doing extensive testing over the course of the last month, which has allowed us to identify issues and inefficiencies throughout. Each of those has been addressed with several improvements and fixes, leaving us with a much faster, more stable client.
Many of the tweaks we made were related to IE9 and Node. Those issues have been resolved and things are working well now. In addition, we further increased performance by shrinking the library size fairly drastically.
Moving forward, we will just be working on bug fixes related to user-reported issues as usage picks up.
We've already released a few blog posts (linked below) that detail how to get up and running, but please visit the Exceptionless.JavaScript GitHub Repo for the most up-to-date documentation.
JavaScript Users can find installation, configuration, usage details and examples here.
We're suckers for feedback, so let us have it whether good, bad, or indifferent. Bugs, etc should be reported on the GitHub Issues page, but feel free to shoot us an in-app message, email, etc and let us know what you think and if you had any issues getting everything working.
We're getting closer and closer to version 1.0 of our JavaScript client, and we wanted to give everyone a demo of installation, configuration, and usage.
If you're using Node.js, make sure to check out last week's blog post for Node specific examples. Otherwise, continue reading for JavaScript examples.
As you read and begin playing with the Exceptionless JavaScript client, please make note of any feedback, bugs, etc, and submit a GitHub issue so we can fast track version 1.0 - we surely appreciate it!
Install the package by running bower install exceptionless
Add the Exceptionless script to your HTML page. We recommend placing the script at the top of the document to ensure Exceptionless picks up and reports the absolute most potential exceptions and events.
Configuration of the Exceptionless JavaScript client can be accomplished a variety of ways. We list the common ways below, but make sure to check the Exceptionless.JavaScript GitHub repo for the most up to date documentation if you run into any problems using this example code. NOTE: The only required setting you need to configure is the client's apiKey.
2. Set the apiKey on the default ExceptionlessClient instance.
var client = exceptionless.ExceptionlessClient.default;
client.config.apiKey ='API_KEY_HERE';
3. Create a new instance of the ExceptionlessClient and specify the apiKey or configuration object. Note that the configuration object is optional.
var client =newexceptionless.ExceptionlessClient('API_KEY_HERE');// Required// or with a configuration object//var client = new exceptionless.ExceptionlessClient({//apiKey: 'API_KEY_HERE',//submissionBatchSize: 100//});
Unhandled exceptions will automatically be sent to your Exceptionless dashboard once the JavaScript client is configured properly. In order to send additional events, including log messages, feature usages, and more, you can use the code samples below and check the Exceptionless.JavaScript GitHub Repo for the latest examples and documentation.
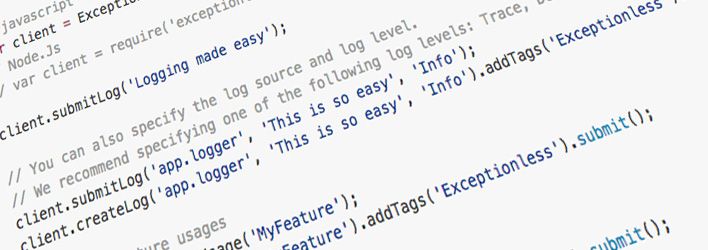
var client = exceptionless.ExceptionlessClient.default;
client.submitLog('Logging made easy');// You can also specify the log source and log level.// We recommend specifying one of the following log levels: Trace, Debug, Info, Warn, Error
client.submitLog('app.logger','This is so easy','Info');
client.createLog('app.logger','This is so easy','Info').addTags('Exceptionless').submit();// Submit feature usages
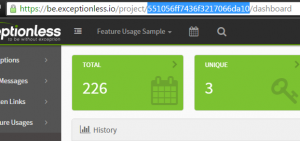
client.submitFeatureUsage('MyFeature');
client.createFeatureUsage('MyFeature').addTags('Exceptionless').submit();// Submit a 404
client.submitNotFound('/somepage');
client.createNotFound('/somepage').addTags('Exceptionless').submit();// Submit a custom event type
client.submitEvent({ message ='Low Fuel', type ='racecar', source ='Fuel System'});
To manually send events other than the automatically reported unhandled exceptions, you can use our fluent event builder API.
The below example demonstrates sending a new error, "test," and setting the ReferenceID, Order and Quote properties, Tags, Geo, UserIdentity, and marking it as Critical.
var client = exceptionless.ExceptionlessClient.default;try{thrownewError('test');}catch(error){
client.createException(error)// Set the reference id of the event so we can search for it later (reference:id).// This will automatically be populated if you call client.config.useReferenceIds();.setReferenceId('random guid')// Add the order object (the ability to exclude specific fields will be coming in a future version)..setProperty("Order", order)// Set the quote number..setProperty("Quote",123)// Add an order tag..addTags("Order")// Mark critical..markAsCritical()// Set the coordinates of the end user..setGeo(43.595089,-88.444602)// Set the user id that is in our system and provide a friendly name..setUserIdentity(user.Id, user.FullName)// Submit the event..submit();}
We built the JavaScript client to be full featured and allow you to report and log all the data our other clients do. It has a fluent API, as mentioned above, and is ready to rock and roll.
We wire up to the window.onerror handler by default, in order to send unhandled exceptions to your Exceptionless dashboard automatically.
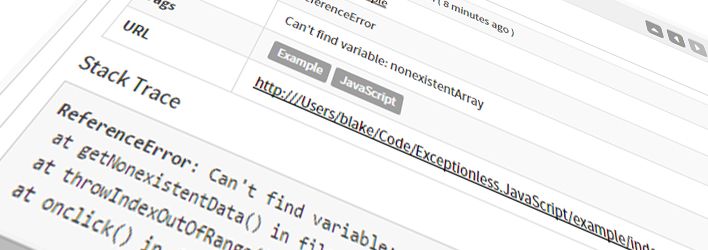
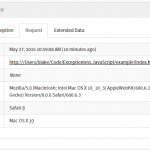
Finishing off the Exceptionless JavaScript client features, every event also includes request information.
A few screenshots of an individual event can be found below.
Request Details
Sample
We have put together an example that you can use to get an idea of how everything works. It is available on the GitHub Repo.
Edit the HTML file in the root example folder and replace the existing API Key with yours. Also, comment out the serverUrl.
Open the HTML file in your browser
Open the console so that you can see the debug messages that the example generates
Click the buttons on the page to submit an event
Troubleshooting
Calling client.config.useDebugLogger(); to enable debug logging is recommend and will output messages to the console regarding what the client is doing. Please contact us by creating an issue on GitHub if you need help or have any feedback regarding the JavaScript client.
As we move forward towards version 1.0 of our JavaScript client, we are looking for any and all feedback, so please don't hesitate to let us know what you think, report a bug, etc.
Last week we announced our full featured JavaScript client, and we're super excited about releasing a version 1.0 soon.
This week we'd like to put more details out there on the Node.js version of the JavaScript client, including installation, configuration, and usage. We've also set up an Express.js sample app that you can spin up locally to play with things.
You can configure the Exceptionless client a few different ways for Node.js. The below is the most common way, but for more configuration options and documentation, visit the Exceptionless.JavaScript GitHub repo. NOTE: The only required setting you need to configure is the client's apiKey.
Set the apiKey on the default ExceptionlessClient instance.
var client =require('exceptionless.node').ExceptionlessClient.default;
client.config.apiKey ='API_KEY_HERE';
Once configured, the Exceptionless Node.js JavaScript client will automatically send your dashboard any unhandled exceptions that happen in your application. If you would like to send additional event types, such as log messages, feature usages, etc, take a look at the below examples.
var client =require('exceptionless.node').ExceptionlessClient.default;
client.submitLog('Logging made easy');// You can also specify the log source and log level.// We recommend specifying one of the following log levels: Trace, Debug, Info, Warn, Error
client.submitLog('app.logger','This is so easy','Info');
client.createLog('app.logger','This is so easy','Info').addTags('Exceptionless').submit();// Submit feature usages
client.submitFeatureUsage('MyFeature');
client.createFeatureUsage('MyFeature').addTags('Exceptionless').submit();// Submit a 404
client.submitNotFound('/somepage');
client.createNotFound('/somepage').addTags('Exceptionless').submit();// Submit a custom event type
client.submitEvent({ message ='Low Fuel', type ='racecar', source ='Fuel System'});
In addition to automatically sending all unhandled exceptions, you can also manually send events to Exceptionless using our fluent event builder API.
The below example demonstrates sending a new error, "test," and setting the ReferenceID, Order and Quote properties, Tags, Geo, UserIdentity, and marking it as Critical.
var client =require('exceptionless.node').ExceptionlessClient.default;try{thrownewError('test');}catch(error){
client.createException(error)// Set the reference id of the event so we can search for it later (reference:id).// This will automatically be populated if you call client.config.useReferenceIds();.setReferenceId('random guid')// Add the order object (the ability to exclude specific fields will be coming in a future version)..setProperty("Order", order)// Set the quote number..setProperty("Quote",123)// Add an order tag..addTags("Order")// Mark critical..markAsCritical()// Set the coordinates of the end user..setGeo(43.595089,-88.444602)// Set the user id that is in our system and provide a friendly name..setUserIdentity(user.Id, user.FullName)// Submit the event..submit();}
If you are using Express.js to develop a web application, you can add Exceptionless and start collecting unhandled errors and 404s very quickly. To start, just add the following middleware to the bottom of your middleware definitions.
// This middleware processes any unhandled errors that may occur in your middleware.
app.use(function(err, req, res, next){
client.createUnhandledException(err,'express').addRequestInfo(req).submit();
res.status(500).send('Something broke!');});// This middleware processes 404’s.
app.use(function(req, res, next){
client.createNotFound(req.originalUrl).addRequestInfo(req).submit();
res.status(404).send('Sorry cant find that!');});
The JavaScript/Node.js client is full featured, will collect all the information our other clients collect, and has a fluent API as shown above.
By default, we wire up to the processes' uncaught exception handler to automatically send any unhandled exceptions to your Exceptionless dashboard. We also submit a log message if your app doesn't shut down properly via inspecting the exit code, which is very useful and lets you know what your app is doing. Additionally, any queued up events are processed and sent before your app closes.
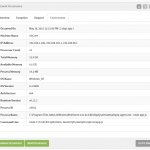
Each event contains environment and request information, as well, rounding out the complete list of Exceptionless features that we have made available via the JavaScript client, making it a great error and event reporting/logging solution for all your Node.js projects.
Environment Details
Sample Express.js App
We have built a quick Express.js sample app that you can play around with to get an idea of how the Node.js JavaScript client works with Exceptionless.
We recommend enabling debug logging by calling client.config.useDebugLogger();. This will output messages to the console regarding what the client is doing. Please contact us by creating an issue on GitHub if you need assistance or have any feedback for the project.
As we move forward towards version 1.0 of our JavaScript client, we are looking for any and all feedback, so please don't hesitate to let us know what you think, report a bug, etc.
That's right ladies and gentlemen, we've been working on a JavaScript client, and it's ready to peak it's head out into the wild.
We're talking beta status here, but version 1.0 is on its way and we wanted to let you guys play with it as soon as possible to provide feedback and help us work out the bugs, etc, quicker.
It's tough to contain our excitement about getting this out there, and we hope you'll check it out!
The client supports Node.js and JavaScript, and you can find up-to-date installation, configuration, and usage documentation over on the GitHub repo.
Just like the non-JavaScript client, unhandled exceptions will be automatically sent upon configuration, and you can send log messages, feature usage events, etc. All the normal Exceptionless functionality is available.
Testers, developers, contributors, and feedback wanted! We want to make the Exceptionless JavaScript client awesome, but we need your help. Give us any feedback you might have via GitHub an in-app message, contact form submission, or comment right here on this blog post. We're more than happy to answer any and all questions, or help you get up and running.
API Status page now also checks the status of Storage, Queues and Message Bus.
Added the ability to requeue events (E.X., archived or events that failed to process).
Added the ability to send out system and release notifications.
Made the event posting and processing async. This has huge performance gains under load.
The GeoIP Database is now stored in the storage folder. This made it easier to update it via a job as well as removed some extra configuration settings.
Made some minor changes that make it a bit easier to self host (more to come 2.1).
Please take a look at the Exceptionless changelog for a full list of the changes.
So you've been using Exceptionless for a while, but you wish you had a different dashboard, or maybe you'd like to integrate event data into one of your apps. No problem, just use the API!
Through our adventures while building Exceptionless, we've kept open source, automation, and ease of use in mind. With that, we think our API, which utilizes Swagger and Swashbuckle to automatically generate, update, and display documentation (which means it works automatically on self-hosted environments), is a great resource for our users that want to get their hands dirty and use Exceptionless data to roll their own tools, dashboards, etc.
Lets take a closer look at the API, how to use it, and some quick examples of what can be done.
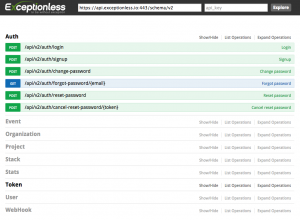
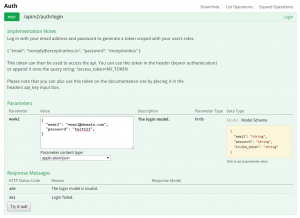
Tokens are used to access the api and have roles (scopes). When you authenticate via the login controller action, you are getting a token that impersonates your user so it has the same roles as your user account (e.g., client and user).
You can enter JSON into the model field, or you an click the yellow box on the right to pre-populate the field with acceptable JSON fields. Just replace the values that you want to specify and remove the fields you don't need, like invite token.
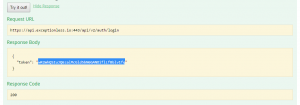
Click "Try it out!" and generate your token. Take note of the response messages section above the button, as it details the possible codes that would be returned in the event of an error (e.g. 401 if the user name or email address was incorrect).
You can see from the response that it returned our token from the request url above. Take your generated token and put it in the "api_key" field at the top of the page and click "Explore." This authorizes you via bearer authentication, authenticates you to the rest api, and allows you to call controller actions.
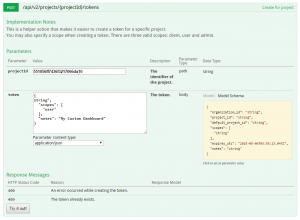
Now, we’ll get a new token for the project we want to work on and assign it a user role (scope) of "user." We want to get a new user scoped token because we want to do more than just post events (client scoped tokens only allow you to post events), we want to retrieve them. Creating a new token also allows us to revoke the token later.
First, get your project ID from the Exceptionless Dashboard. It can be found in the URL of that project’s dashboard.
Next, we'll click "Try it out!" and generate our new token id.
Now, once again, copy this new token and place it in the "api_key" field at the top of the page and click "Explore." Now everything we do will be authenticated to this new user token you’ve just created.
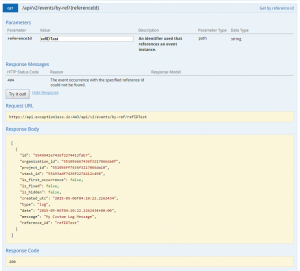
You’ll see a few basic examples of events and some explanation of the resource in this panel. Make sure to give it a read. For this example, we’ll use a simple log event, with a brief message, and add a reference ID to it. Note that you must also enter the current API version in the "version" field.
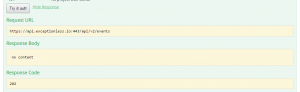
When we click "Try it out!" and get a 202 response code, we know we’ve created an event.
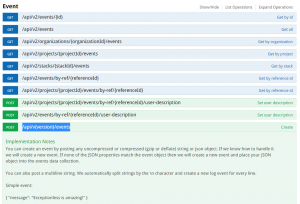
If we want to get the event we just created by it’s reference_id, we can navigate to Event > GET /api/v2/events/by-ref/{referenceId}, enter that reference ID, and get back the details of the event.
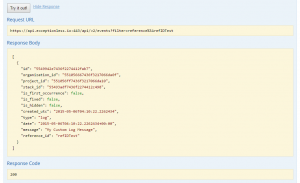
Another example of getting an event may include using the reference ID or another search filter we just created and getting all by a reference filter. You can use any search filter in the filter parameter.
To do so, navigate to Event > GET /api/v2/events and use the reference term to filter events by the reference ID.
The api documentation uses bearer authentication to authenticate to the API. You can do this in your apps too by specifying a bearer authorization header with your token as shown below.
Everything we’ve shown you today can be easily and cleanly accessed via a URL query string and your access token.
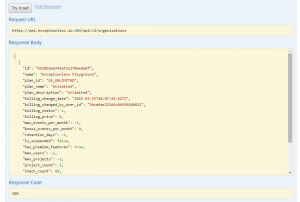
For example, if we want to view our organizations, we simply navigate to https://api.exceptionless.io/api/v2/organizations, add the query string "?access_token={token}" and press enter to get the data.
We've tried to make the API as easy and intuitive to use as possible, but we're always open to feedback and comments, so please let us know what could be better, easier, faster, etc.
And, of course, if you have any questions about the API, please leave a comment here, send us an in-app support message, or simply submit the website contact form.
One of the most requested features from the beginning of Exceptionless 1.0 was a filtering and searching system. When we started developing Exceptionless 2.0, we knew it was one of the major features we wanted to include.
We couldn't just throw in a string search and hope for the best. We had to build it in a way that let users perform basic and advanced filtering, easily, with fast and streamlined results.
Enter Exceptionless filtering and searching. You can filter by organization, project, multiple time frame selectors, and specific event variables (with modifiers).
Watch the video below for a quick test drive, and read further down the page for more details and links!
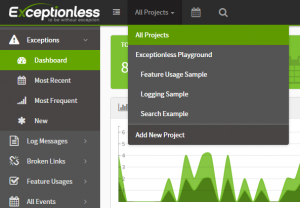
By default, the dashboard loads up with all projects selected.
To show only data from a specific organization or project within an organization, simply click on the "All Projects" drop down in the top left of the dashboard and select your organization or project.
Whatever view you are in will then be transformed to display only data from that organization/project.
To change it back to all projects, simply select the drop down again and click on "All Projects."
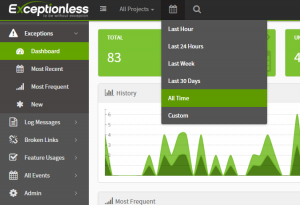
Exceptionless offers multiple preset time frame options, as well as the ability to customize the time frame down to the second.
To select your time frame of choice, click on the calendar icon next to the project drop down on the top navigation bar of your dashboard.
Once there, you can select "Last Hour," "Last 24 Hours," "Last Week," "Last 30 Days," "All Time," or "Custom."
Most of these options are pretty self explanatory, but if you click on "Custom," a popup will appear that lets you select the start and end date, as well as start and end hours, minutes, and seconds of those dates.
Another way to control the data time frame is to simply select a period of time on the history graph itself by clicking, dragging, and releasing. This will automatically update the custom time frame points and refresh the data to match that period.
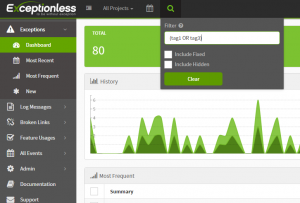
Being able to search your errors and events by specific criteria is, perhaps, the largest improvement for version 2.0.
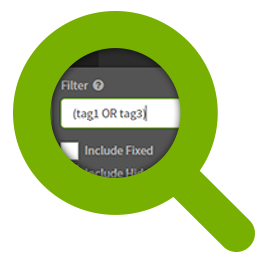
By selecting the magnifying glass icon next to the calendar icon in the top navigation, you can enter search criteria and select whether you want the results to include fixed and/or hidden events/errors.
You can filter by tag, ID, organization, project, stack, type, value, IP, architecture, user, and much much more. Some searches, such as ID, require a prefix ("id:") on the search, but others, such as error.message, can be entered as strings ("A NullReferenceException occurred"). View a complete list of searchable terms, examples, and FAQs on our Searching Documentation Page.
Please let us know what you think of the filtering and searching abilities by commenting here on the blog, sending us an in-app support message, or filling out our contact form. We're always looking for feedback, and genuinely want to know what you think!
Giving back to the development community is important to us over here at Exceptionless. We love open source!
As such, the Exceptionless NuGet assembly library, with 31 assemblies and over 176,000 package downloads, is ever growing and expanding right along with our GitHub repos.
We thought we would give everyone a quick tour, and at the same time perhaps provide a good resource and reference page.
Exceptionless, our primary open source application, provides real-time error, feature, and log reporting for ASP.NET, Web API, WebForms, WPF, Console, and MVC apps (and more, soon!).
Below you will find the NuGet assemblies for all the platforms we currently support.
Exceptionless.Portable
Exceptionless client for portable (PCL) applications. This is the base library all the other implementations build on top of. It contains all the basic functionality that powers the Exceptionless clients! This library can be used on many different platforms. It’s worth noting that this is a very basic client and as such you won’t get all the bells and whistles as described here in the PCL configuration section. For those bells and whistles, see the Exceptionless package, below.
Frameworks: .NET 4, .NET 4.5, Silverlight 5, Windows 8, Windows Phone 8.1, Windows Phone Silverlight 8
Exceptionless Exceptionless client for non visual (ie. Console and Services) applications.** **We recommend using this package if you are not using any other platform specific packages (E.G., Exceptionless.Mvc), as it provides all the bells and whistles that are missing in the portable package.
Frameworks: .NET 4.0, .NET 4.5
Exceptionless.Mvc Exceptionless client for ASP.NET MVC 3+ applications.
Frameworks: .NET 4.0, .NET 4.5
Exceptionless.WebApi Exceptionless client for ASP.NET Web API applications.
Frameworks: .NET 4.0, .NET 4.5
Exceptionless.Web Exceptionless client for ASP.NET WebForms applications.
Frameworks: .NET 4.0, .NET 4.5
Foundatio (Requires .NET 4.5) is an open source library for building distributed applications that we built, use, and think you will find helpful. Foundatio provides in memory, redis, and azure implementations. This allows you to do development or testing using in-memory versions and switch them out for redis or azure implementations in production. This saves you time (setup and maintaining) and money (not paying for cloud resources) during development and testing! Foundatio source code can be found at https://github.com/FoundatioFx/Foundatio.
Exceptionless was built using Foundatio and utilizes implementations for caching, queues, locks, messaging, jobs, file storage, and metrics.
Foundatio
Foundatio consists of pluggable foundation blocks for building distributed apps, including caching, queues, locks, messaging, jobs, file storage, and metrics.
Foundatio Redis Implementations
Contains the redis implementations of caching, queues, locks, messaging, jobs, file storage.
Foundatio Azure ServiceBus Implementations
Contains the redis implementations of queues and messaging. The azure packages are split into different packages so you don't have to take extra azure dependencies on things you don't need.
Foundatio Azure Storage Implementations
Contains the redis implementations of file storage. The azure packages are split into different packages so you don't have to take extra azure dependencies on things you don't need.
Exceptionless RandomData
RandomData is a utility class for easily generating random data, making the creation of good unit test data a breeze.
Frameworks: .NET 4.0, .NET 4.5 View Source
Exceptionless DateTimeExtensions
This package includes DateTimeRange, Business Day, and various DateTime, DateTimeOffset, and TimeSpan extension methods.
Frameworks: .NET 4.0, .NET 4.5, Windows 8, Windows Phone 8.1 View Source
We don't plan on stopping anytime soon, and will continue writing assemblies to make life easier for developers everywhere. Naturally, we could always use your help, so fork us on GitHub if you feel like chipping in. We always appreciate our contributors!
Otherwise, let us know what you think of Exceptionless, Foundatio, and all our other projects. Feedback is always welcomed and appreciated.